# Application Development and Governance Based on Spring Cloud Microservice Framework
This article will take Spring Cloud as an example to introduce the best practices for building microservice applications on Erda.
Compared with traditional monolithic applications, the biggest change in microservice architecture is service splitting, specifically, splitting business components by business domain. For example, it adopts domain-driven design (DDD) to split a microservice into multiple ones, and each collaborates with others to achieve features.
The microservice architecture solves many problems of monolithic applications, and at the same time increases the complexity of the architecture. The following will introduce how to realize development and governance of microservice applications on Erda in response to the architecture changes, mainly including:
- Service discovery and invocation
- Centralized management of service configuration
- API opening and testing of service
- Observable governance of service
Tips
Microservice applications are naturally distributed applications, and the distributed architecture solutions involved, such as distributed caching, queues, transactions, etc., are not discussed in this article.
# Microservice Design
First create a microservice project called bestpractice (with 4 core CPU and 8 GB memory allocated), and create microservice applications echo-web and echo-service (select business application for application type and internal repository for repository).
echo-web simulates business aggregation layer to call echo-service to complete service functions internally and provide Open API via Erda's API gateway externally, including:
- Provide /api/content API to call echo-service to realize addition, deletion and modification of content resources.
- Provide /api/error API to call echo-service to create exceptions.
echo-service simulates service layer of single business domain to process business logic and realize persistence, including:
- Provide /echo/content API to realize addition, deletion and modification of content resources.
- Provide /echo/error API to create exceptions.
echo-web and echo-web realize registration and discovery of service interfaces through registration center, and realize unified configuration management and hot loading through configuration center.
# API Design
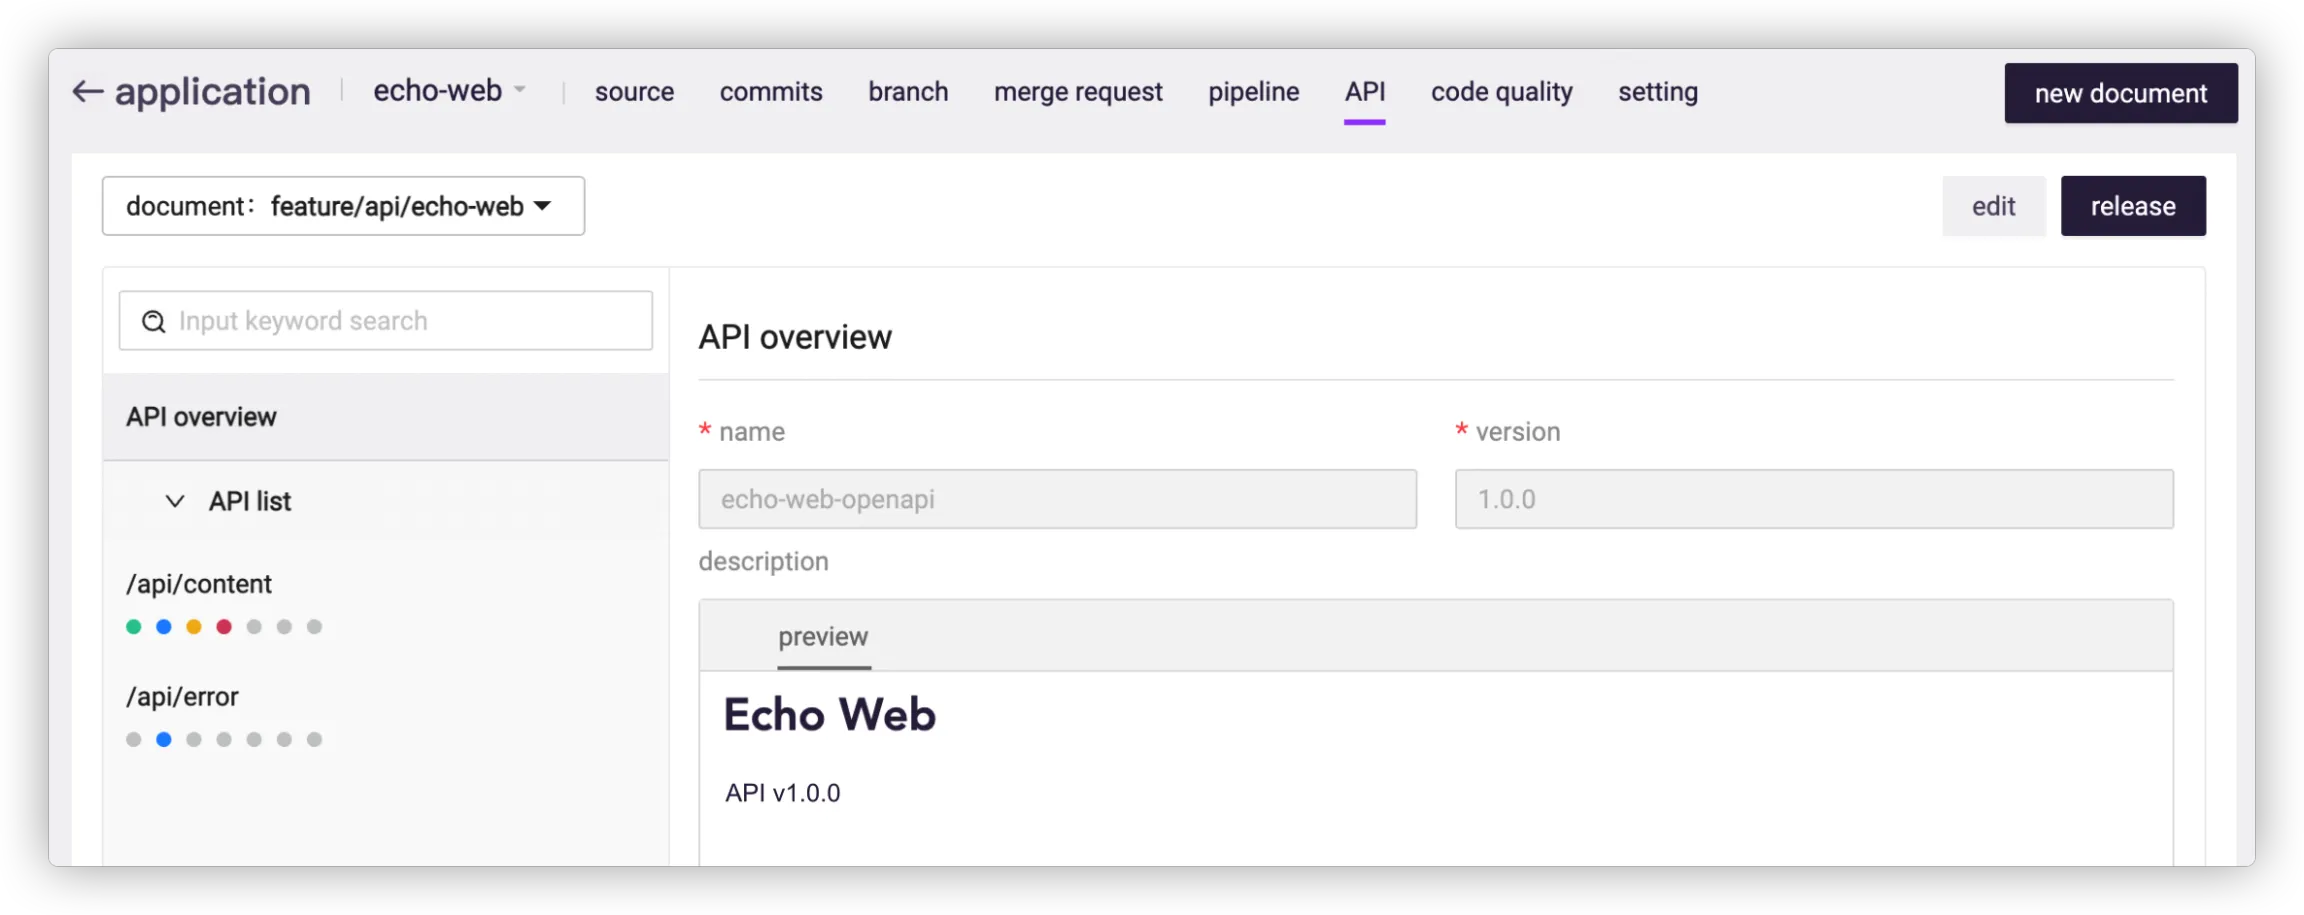
Go to Application of echo-web > API > New Document, select the branch of feature/api and name it echo-web.
Tips
echo-web is the service name, which is consistent with that in dice.yml.
# Data Type
content: parameter name “content”, type “String”
ContentRequest: parameter name “ContentRequest”, type “Object”, parameter reference type “content”
ContentResponse: parameter name “ContentResponse”, type “Object”, parameter reference type “content”
# APIs
API of echo web
1. /api/content
	1. Method: GET
		Response
			MediaType: application/json
			Type: ContentResponse
	2. Method: PUT
		Body
			MediaType: application/json
			Type: ContentRequest
	3. Method: POST
		Body
			MediaType: application/json
			Type: ContentRequest
	4. Method: DELETE
		Response
			MediaType: application/json
			Type:Object
				Parameter name: deleted, Type: Boolean
2. /api/error
	1. Method:POST
		Body
			MediaType: application/json
			Type:Object
				Parameter name: type, Type: String
Click Release, and fill in the API name as Echo API, API ID as echo-web, and release version as 1.0.0.
![]()
API of echo service
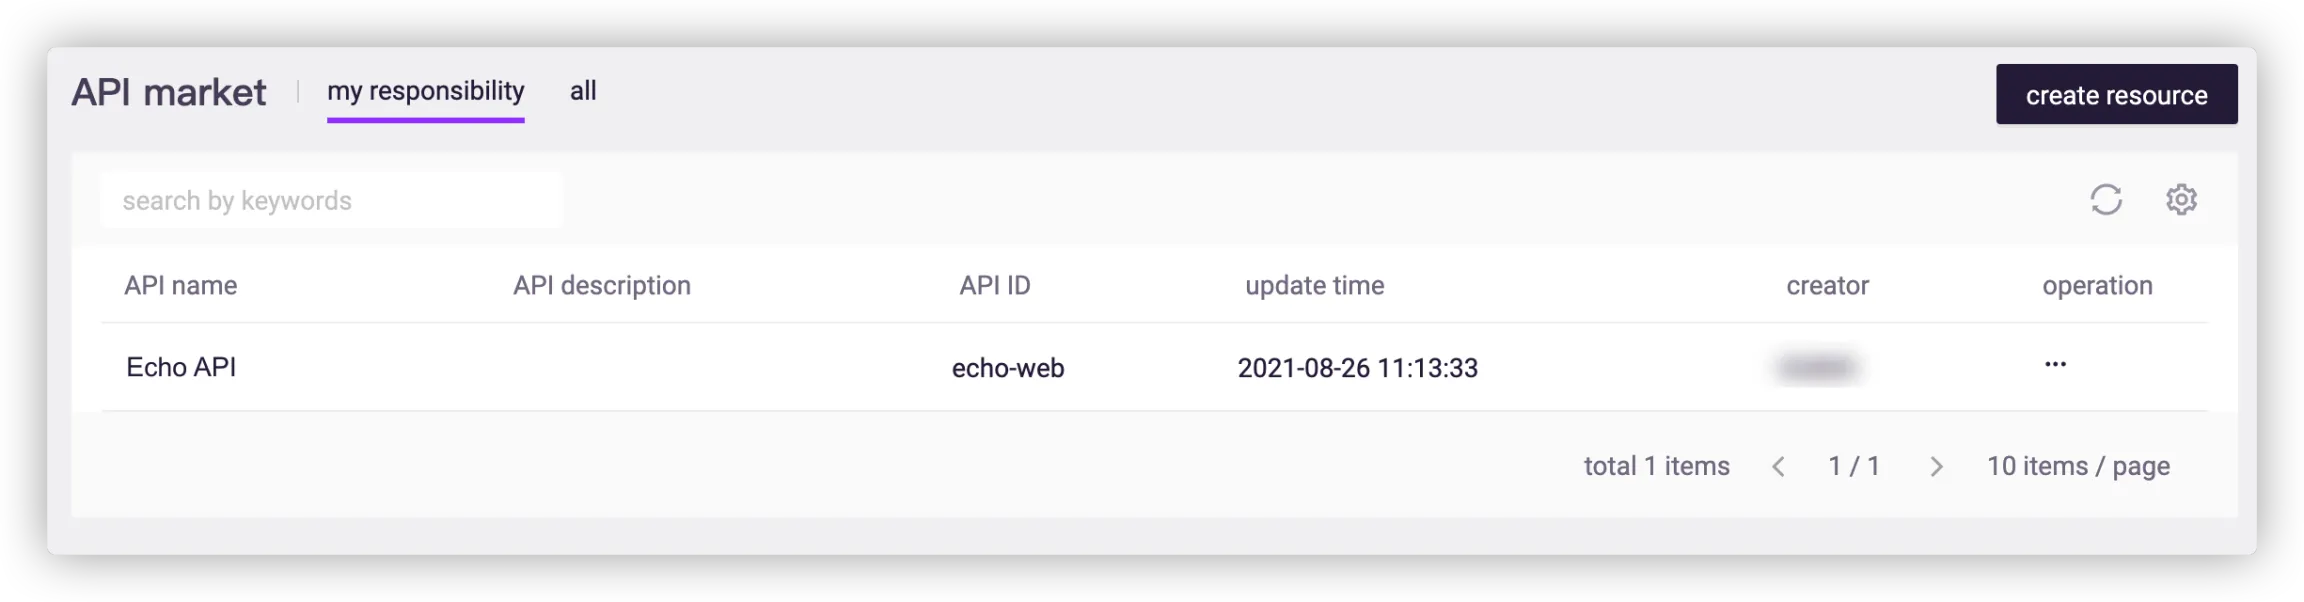
1. /echo/content
	1. Method: GET
		Response
			MediaType: application/json
			Type: ContentResponse
	2. Method: PUT
		Body
			MediaType: application/json
			Type: ContentRequest
	3. Method: POST
		Body
			MediaType: application/json
			Type: ContentRequest
	4. Method: DELETE
		Response
			MediaType: application/json
			Type:Object
				Parameter name: deleted, Type: Boolean
1. /echo/error
	1. Method: POST
		Body
			MediaType: application/json
			Type:Object
				Parameter name: type, Type: String
Go to DevOps Platform > API > API Market to view and manage APIs.
![]()
Tips
- The published API document is private by default and can only be viewed by members of the associated application.
- If it is an enterprise-level Open API, it can be set as public, which is convenient for all users of the organization to view.
# Application Development
# echo service
# Create an Application Based on Spring Boot Development Framework
Use IDEA to create a Maven project (Java 1.8) and configure the Spring Boot framework. The directory structure is as follows:
├── pom.xml
└── src
    ├── main
    │   ├── java/io/terminus/erda/bestpractice/echo
    │   │                                      ├── Application.java
    │   │                                      └── controller
    │   │                                          └── DefaultController.java
    │   └── resources
    │       └── application.yml
    └── test
        └── java
Edit the pom.xml file:
<?xml version="1.0" encoding="UTF-8"?>
<project xmlns="http://maven.apache.org/POM/4.0.0"
         xmlns:xsi="http://www.w3.org/2001/XMLSchema-instance"
         xsi:schemaLocation="http://maven.apache.org/POM/4.0.0 http://maven.apache.org/xsd/maven-4.0.0.xsd">
    <modelVersion>4.0.0</modelVersion>

    <groupId>io.terminus.erda.bestpractice.echo</groupId>
    <artifactId>echo-service</artifactId>
    <version>1.0-SNAPSHOT</version>

    <properties>
        <maven.compiler.source>8</maven.compiler.source>
        <maven.compiler.target>8</maven.compiler.target>
    </properties>

    <parent>
        <groupId>org.springframework.boot</groupId>
        <artifactId>spring-boot-starter-parent</artifactId>
        <version>2.1.4.RELEASE</version>
        <relativePath/>
    </parent>

    <dependencies>
        <dependency>
            <groupId>org.springframework.boot</groupId>
            <artifactId>spring-boot-starter-web</artifactId>
        </dependency>
    </dependencies>

    <dependencyManagement>
        <dependencies>
            <dependency>
                <groupId>org.springframework.cloud</groupId>
                <artifactId>spring-cloud-dependencies</artifactId>
                <version>Greenwich.SR1</version>
                <type>pom</type>
                <scope>import</scope>
            </dependency>
        </dependencies>
    </dependencyManagement>

    <build>
        <finalName>echo-service</finalName>
        <plugins>
            <plugin>
                <groupId>org.springframework.boot</groupId>
                <artifactId>spring-boot-maven-plugin</artifactId>
                <configuration>
                    <executable>true</executable>
                    <mainClass>io.terminus.erda.bestpractice.echo.Application</mainClass>
                </configuration>
                <executions>
                    <execution>
                        <goals>
                            <goal>repackage</goal>
                        </goals>
                    </execution>
                </executions>
            </plugin>
        </plugins>
    </build>
</project>
Tips
The build part of pom.xml uses spring-boot-maven-plugin to build Fat JAR and will be used as executable JAR file for later artifacts.
Edit the Application.java file:
package io.terminus.erda.bestpractice.echo;

import org.springframework.boot.SpringApplication;
import org.springframework.boot.autoconfigure.SpringBootApplication;

@SpringBootApplication
public class Application {
    public static void main(String[] args) {
        SpringApplication.run(Application.class, args);
    }
}
Edit the DefaultController.java file to add health check API:
package io.terminus.erda.bestpractice.echo.controller;

import org.springframework.web.bind.annotation.RequestMapping;
import org.springframework.web.bind.annotation.RequestMethod;
import org.springframework.web.bind.annotation.RestController;

@RestController
@RequestMapping(value = "/api")
public class DefaultController {
    @RequestMapping(value = "/healthy", method = RequestMethod.GET)
    public boolean healthy() {
        return true;
    }
}
Tips
The health check API, used in dice.yml, is provided to Kubernetes for liveness and readiness check. It is necessary to ensure that the service is healthy and available when it returns 200.
# Associate Remote Repository and Push Code
git remote add erda https://erda.cloud/trial/dop/bestpractice/echo-web
git push -u erda --all
git push -u erda --tags
# echo web
Refer to the development process of echo service above and complete the following:
- Create an application based on Spring Boot development framework.
- Associate remote repository and push code.
# CI/CD Pipeline
The following takes echo-service as an example for pipeline orchestration, which can be used as a reference for echo-web.
# pipeline.yml
Go to the application of echo-service to add a new pipeline, select the java-boot-maven-erda template and switch to the code mode for editing:
...
              Service name in dice.yml:
                cmd: java -jar /target/jar package name
                copys:
                  - ${java-build:OUTPUT:buildPath}/target/jar package name:/target/jar package name
                image: registry.cn-hangzhou.aliyuncs.com/terminus/terminus-openjdk:v11.0.6
...
Modify the template as follows:
              echo-service:
                cmd: java ${java-build:OUTPUT:JAVA_OPTS} -jar /target/echo-service
                copys:
                  - ${java-build:OUTPUT:buildPath}/target/echo-service.jar:/target/echo-service.jar
                  - ${java-build:OUTPUT:buildPath}/spot-agent:/
                image: registry.cn-hangzhou.aliyuncs.com/terminus/terminus-openjdk:v11.0.6
Tips
The name used to replace the JAR package in pipeline.yml needs to be consistent with the build.finalName of pom.xml in echo-service application, and the name used to replace the service in dice.yml should be the same with that in dice.yml.
# dice.yml
Add an dice.yml file in the code repository, add a node and configure as shown below:
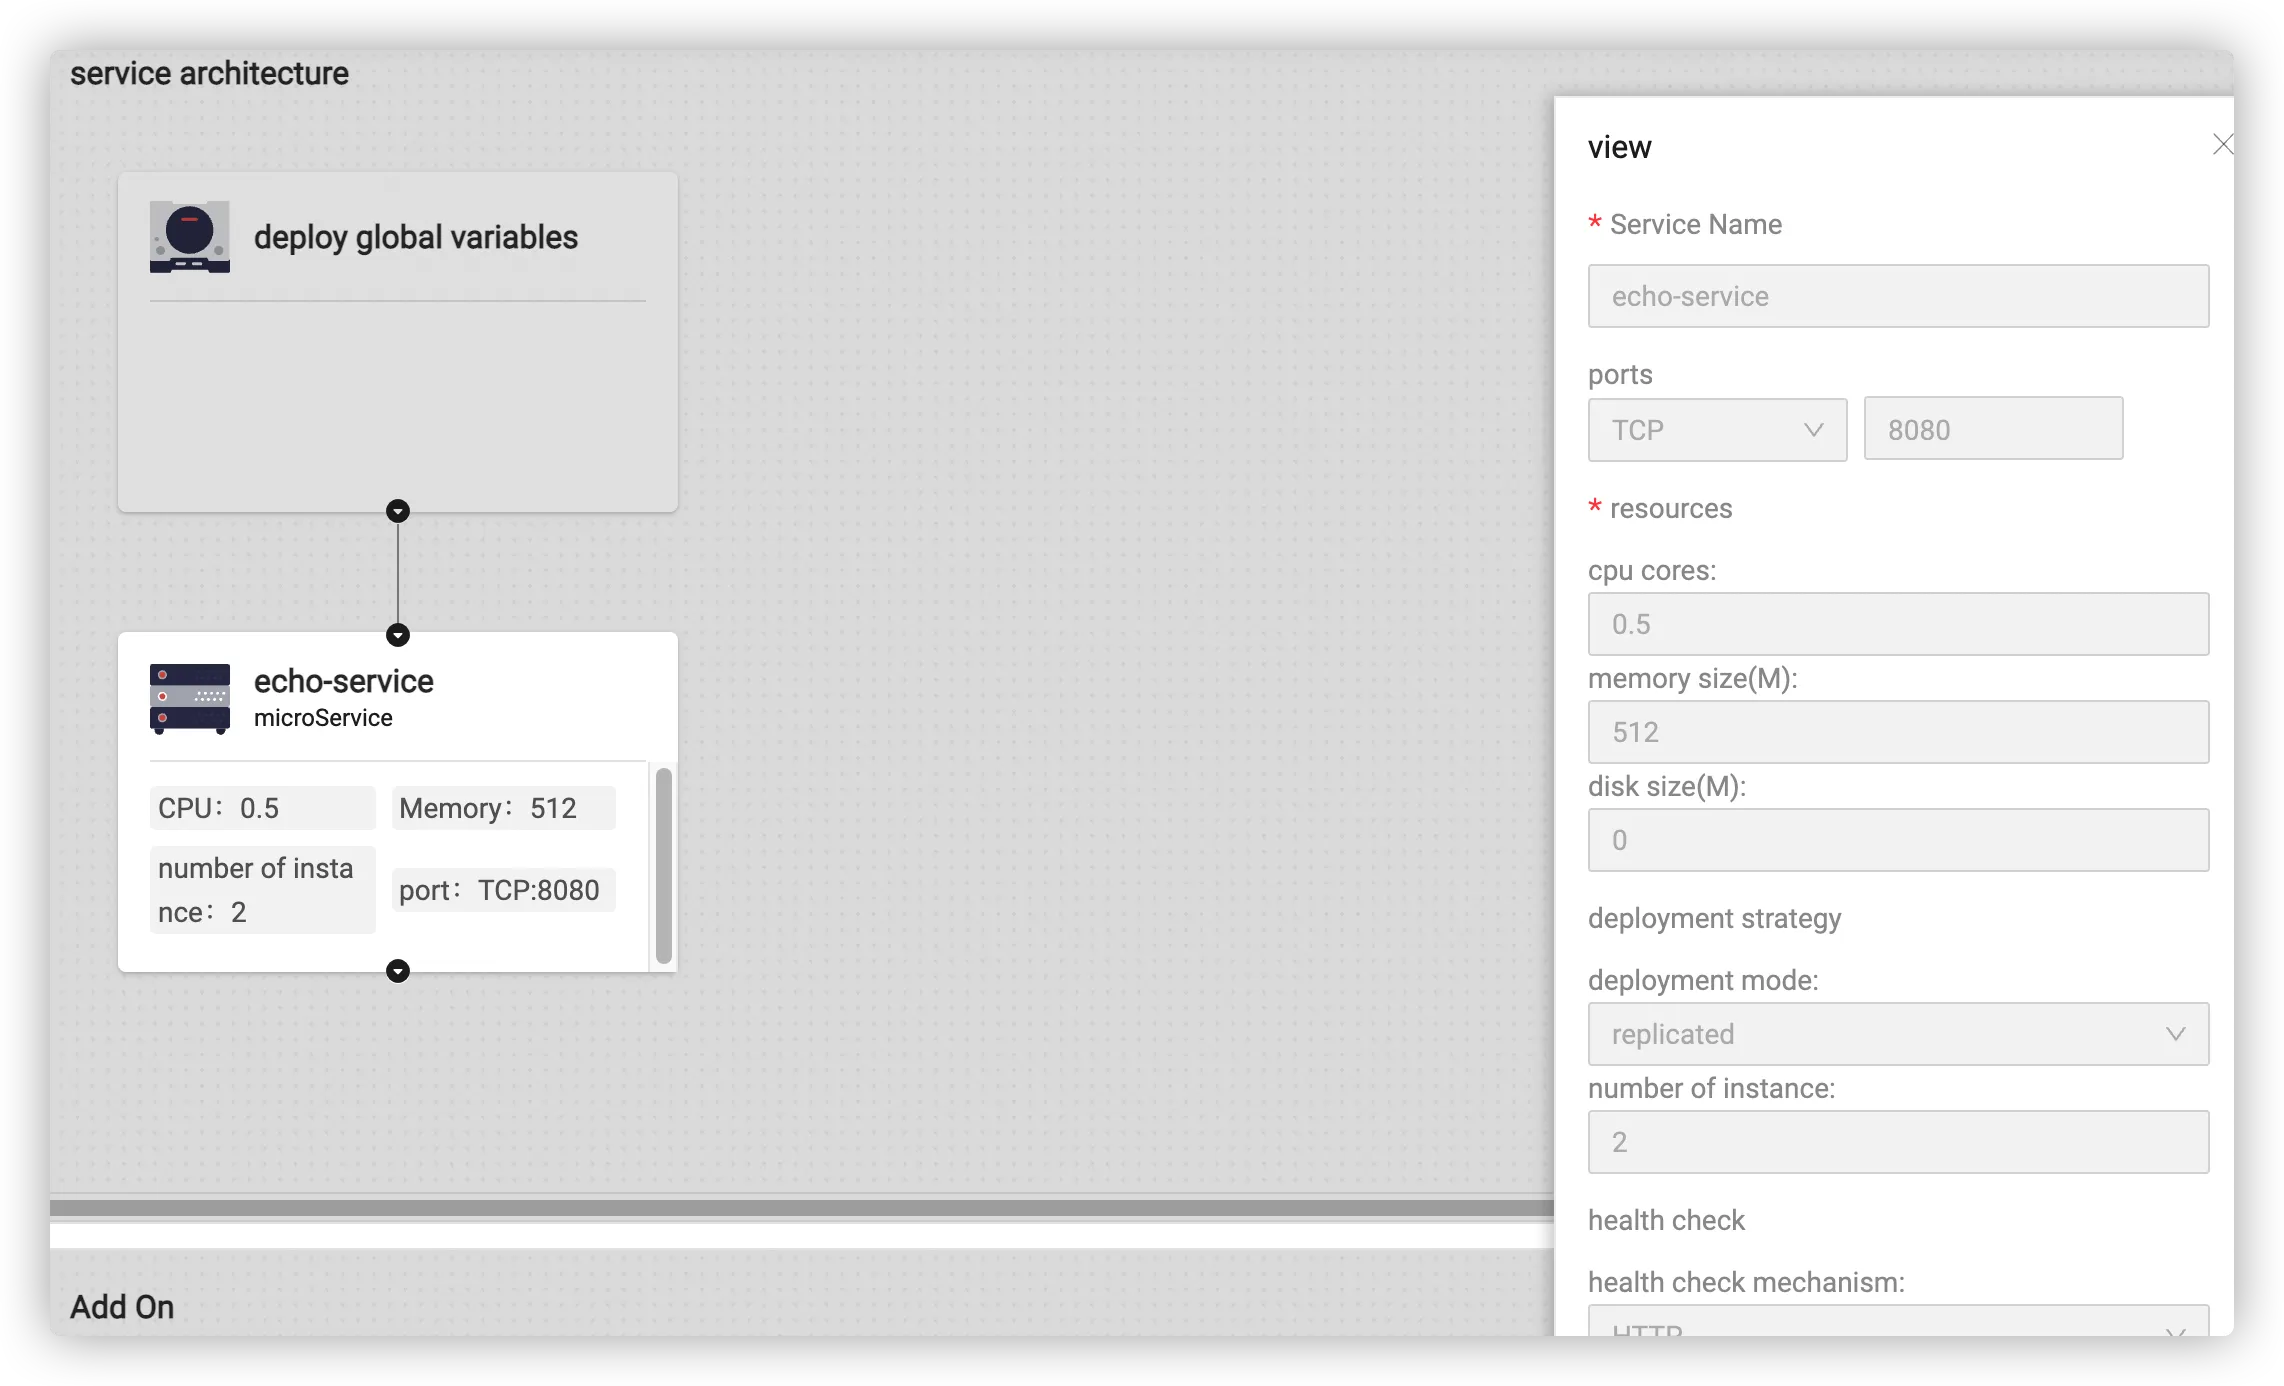
Tips
- The service name in dice.yml should be consistent with that in pipeline.yml.
- The health check port needs to be consistent with the port that the application listens to. The Tomcat server built in the Spring Boot framework listens to port 8080 by default.
The application can be built and released by running pipeline tasks after it is developed.
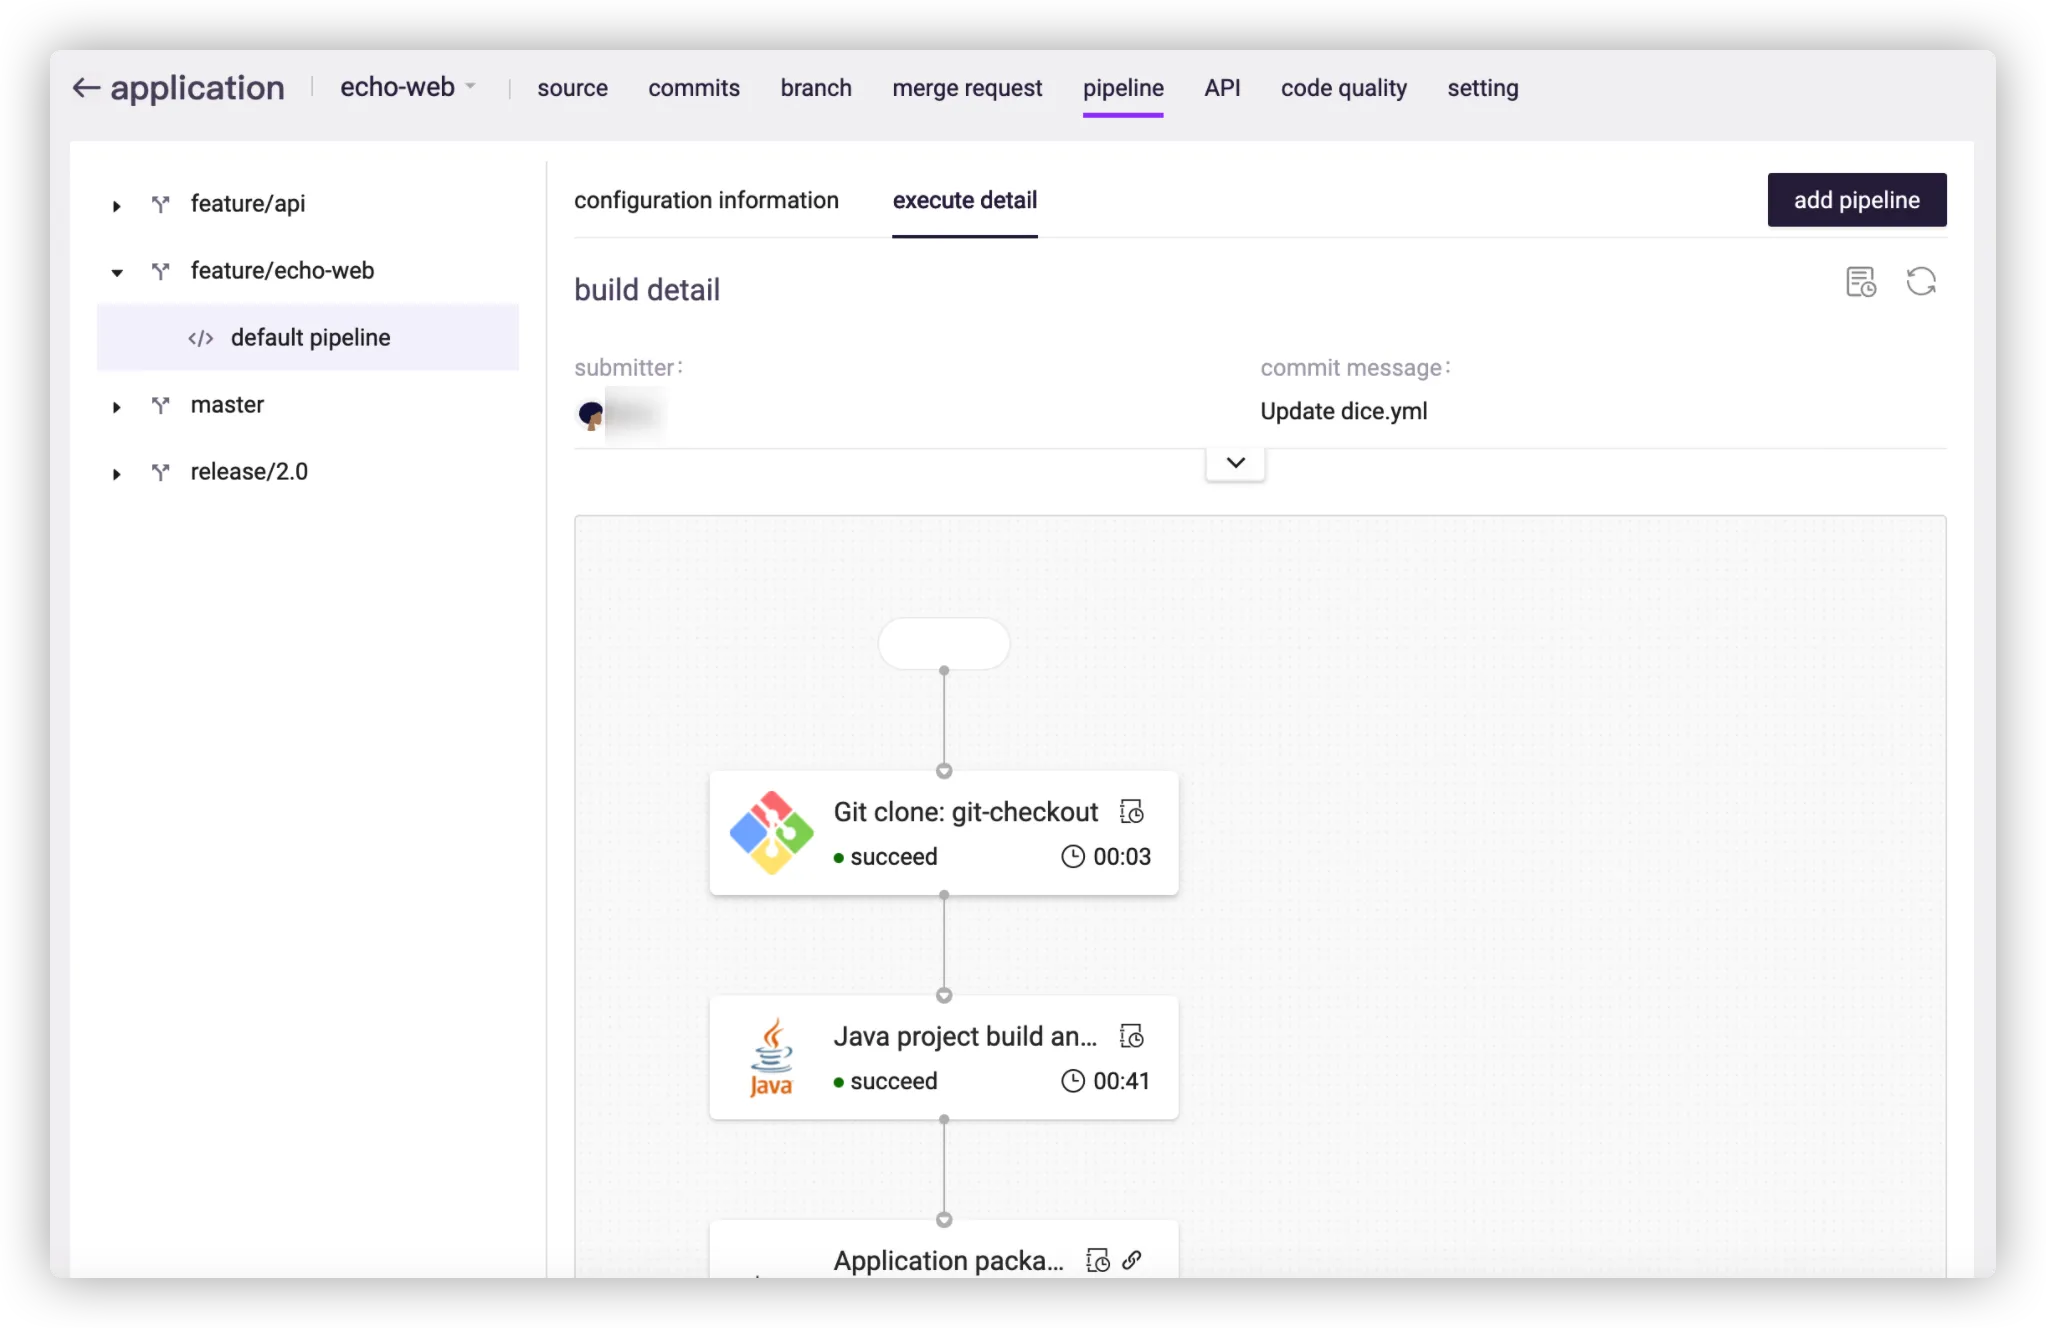
# Service Registration and Discovery
The following will introduce service registration and discovery based on Spring Cloud and the registration center of Erda.
# echo service
The registration center of Erda is implemented based on Nacos (for details, see Use Cloud Service of Nacos), so add Nacos dependencies in the pom.xml file:
        <dependency>
            <groupId>com.alibaba.cloud</groupId>
            <artifactId>spring-cloud-starter-alibaba-nacos-discovery</artifactId>
            <version>2.1.0.RELEASE</version>
        </dependency>
At the same time, configure the registration center in src/main/resources/application.yml:
```
spring:
  application.name: echo-service
  cloud:
    nacos:
      discovery:
        server-addr: ${NACOS_ADDRESS:127.0.0.1:8848}
        namespace: ${NACOS_TENANT_ID:}
```
Tips
application.name must be consistent with that in code.
The annotation of @EnableDiscoveryClient added to io.terminus.erda.bestpractice.echo.Application class indicates that service registration and discovery should be enabled for the application.
```
package io.terminus.erda.bestpractice.echo;

@SpringBootApplication
@EnableDiscoveryClient
public class Application {
    public static void main(String[] args) {
        SpringApplication.run(Application.class, args);
    }
}
```
Develop io.terminus.erda.bestpractice.echo.controller.EchoController class and achieve functional API:
package io.terminus.erda.bestpractice.echo.controller;

import org.springframework.web.bind.annotation.RequestBody;
import org.springframework.web.bind.annotation.RequestMapping;
import org.springframework.web.bind.annotation.RequestMethod;
import org.springframework.web.bind.annotation.RestController;

class Content {
    public String content;

    public void setContent(String content) {
        this.content = content;
    }

    public String getContent() {
        return content;
    }
}

@RestController
@RequestMapping(value = "/echo/content")
public class EchoController {
    private String c = "";

    @RequestMapping(method = RequestMethod.PUT)
    public void echoPut(@RequestBody Content content) {
        c = content.content;
    }

    @RequestMapping(method = RequestMethod.POST)
    public void echoPost(@RequestBody Content content) {
        if (c != content.content) {
            c = content.content;
        }
    }

    @RequestMapping(method = RequestMethod.DELETE)
    public void echoDelete() {
        c = "";
    }

    @RequestMapping(method = RequestMethod.GET)
    public String echoGet() {
        return c;
    }
}
# echo web
Refer to echo service for pom.xml and application.yml.
Create an interface class io.terminus.erda.bestpractice.echo.controller.EchoService for echo service:
package io.terminus.erda.bestpractice.echo.controller;

import org.springframework.cloud.openfeign.FeignClient;
import org.springframework.web.bind.annotation.RequestBody;
import org.springframework.web.bind.annotation.RequestMapping;
import org.springframework.web.bind.annotation.RequestMethod;

@FeignClient(name="echo-service")
@RequestMapping(value = "/echo")
public interface EchoService {
    @RequestMapping(value = "/content", method = RequestMethod.PUT)
    void echoPut(@RequestBody Content content);

    @RequestMapping(value = "/content", method = RequestMethod.POST)
    void echoPost(@RequestBody Content content);

    @RequestMapping(value = "/content", method = RequestMethod.GET)
    String echoGet();

    @RequestMapping(value = "/content", method = RequestMethod.DELETE)
    void echoDelete();
}
Realize resource content creation, deletion and modification in io.terminus.erda.bestpractice.echo.controller.EchoController:
@RestController
@RequestMapping(value = "/api")
public class EchoController {
    @Autowired
    private EchoService echoService;

    @RequestMapping(value = "/content", method = RequestMethod.PUT)
    public void echoPut(@RequestBody Content content) {
        echoService.echoPut(content);
    }

    @RequestMapping(value = "/content", method = RequestMethod.POST)
    public void echoPost(@RequestBody Content content) {
        echoService.echoPost(content);
    }

    @RequestMapping(value = "/content", method = RequestMethod.GET)
    public Content echoGet() {
        Content content = new Content();
        String c = echoService.echoGet();
        content.setContent(c);
        return content;
    }

    @RequestMapping(value = "/content", method = RequestMethod.DELETE)
    public void echoDelete () {
        echoService.echoDelete();
    }

    @RequestMapping(value = "/healthy", method = RequestMethod.GET)
    public Boolean health() {
        return true;
    }
}

class Content {
    private String content;

    public void setContent(String content) {
        this.content = content;
    }

    public String getContent() {
        return content;
    }
}
# dice.yml
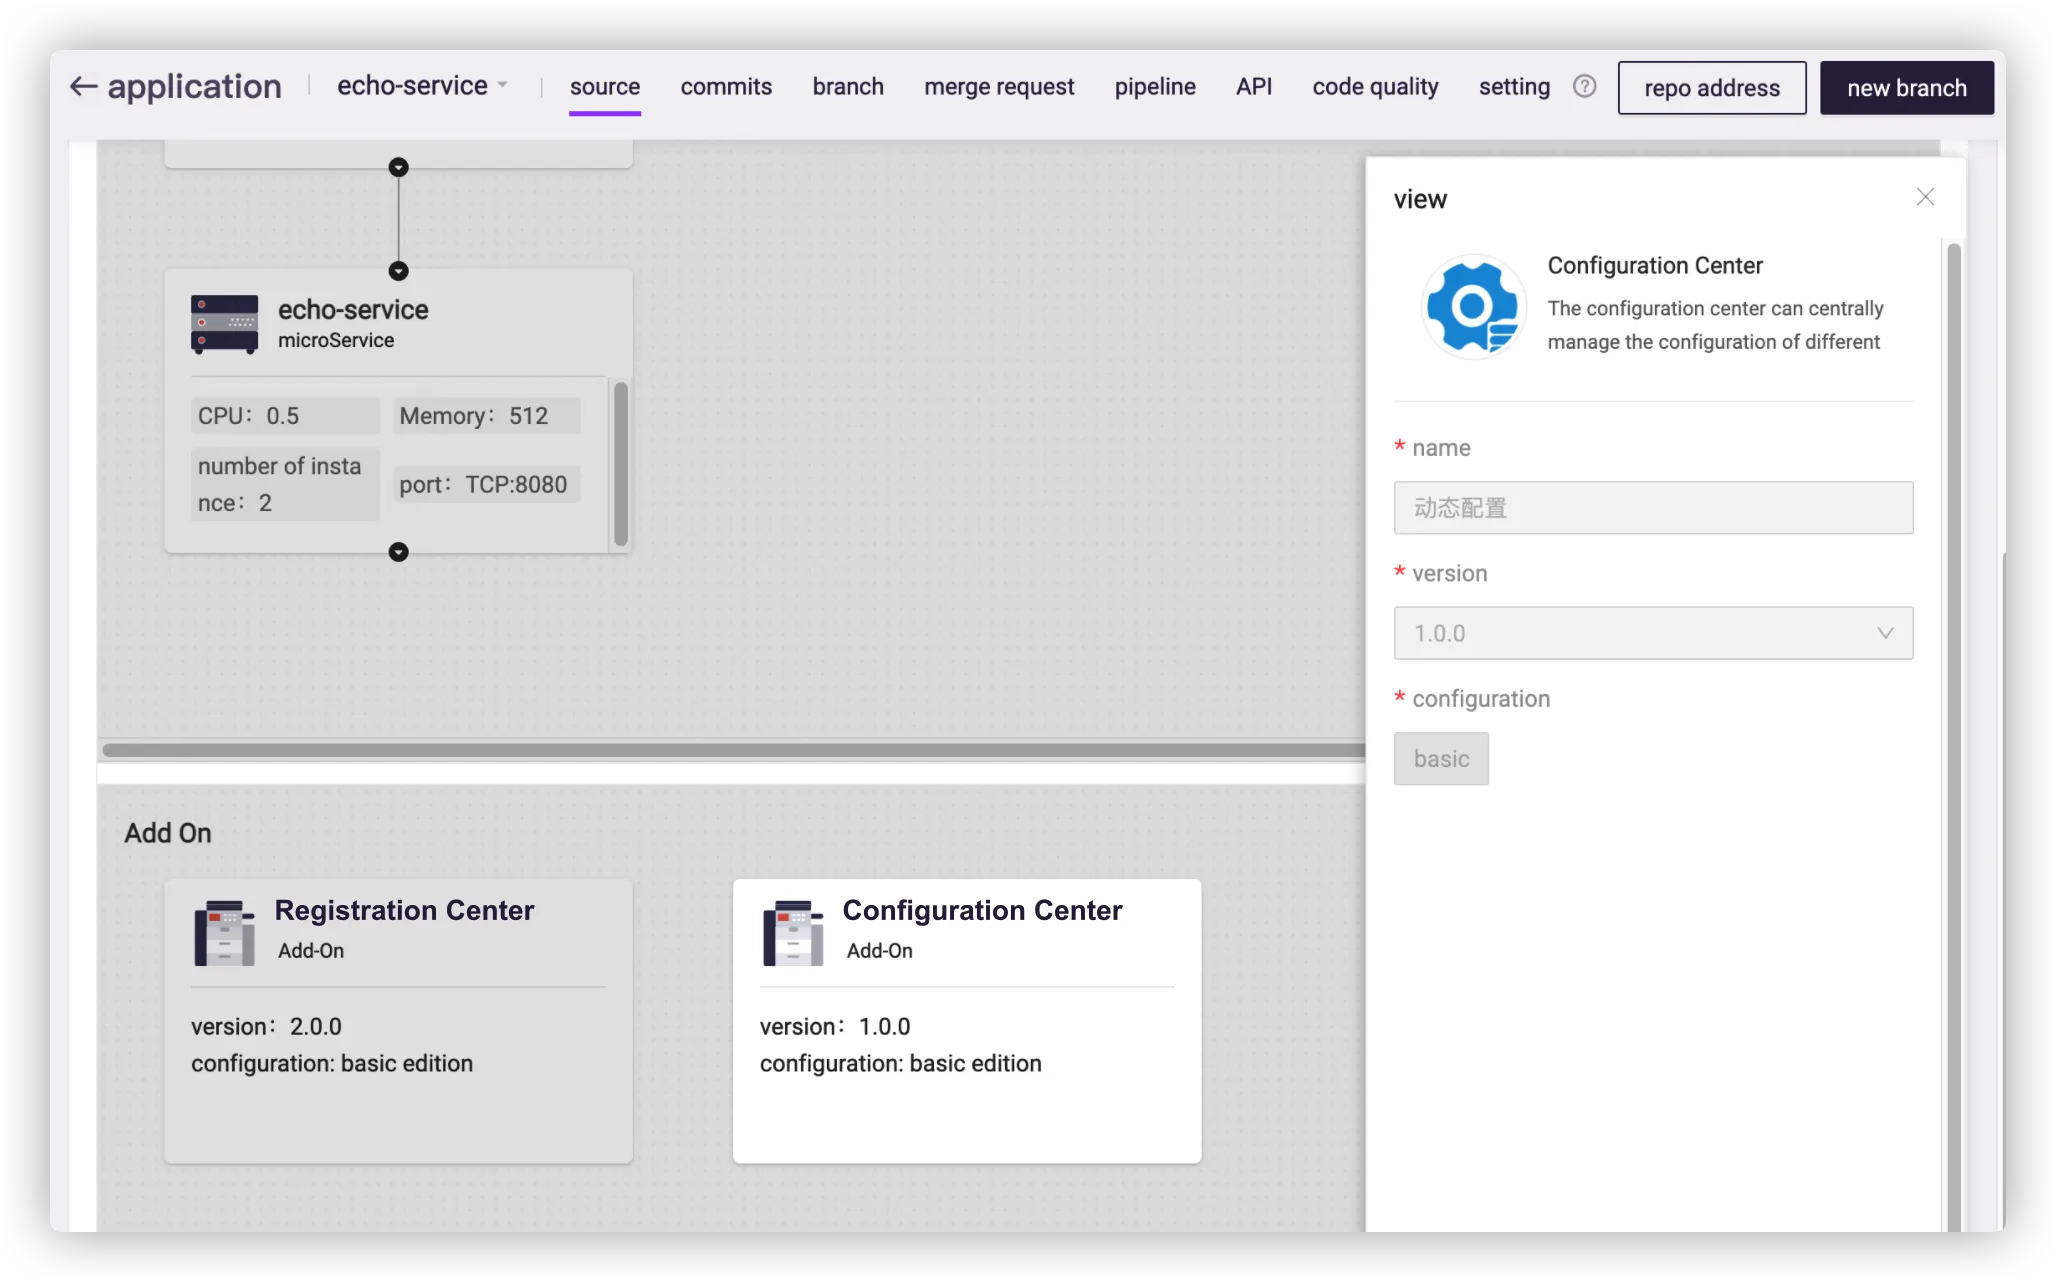
Edit dice.yml of echo-web and echo-service, and add an addon of registration center.

Run pipelines of echo-web and echo-service again, then you can see Registration Center in Environments.
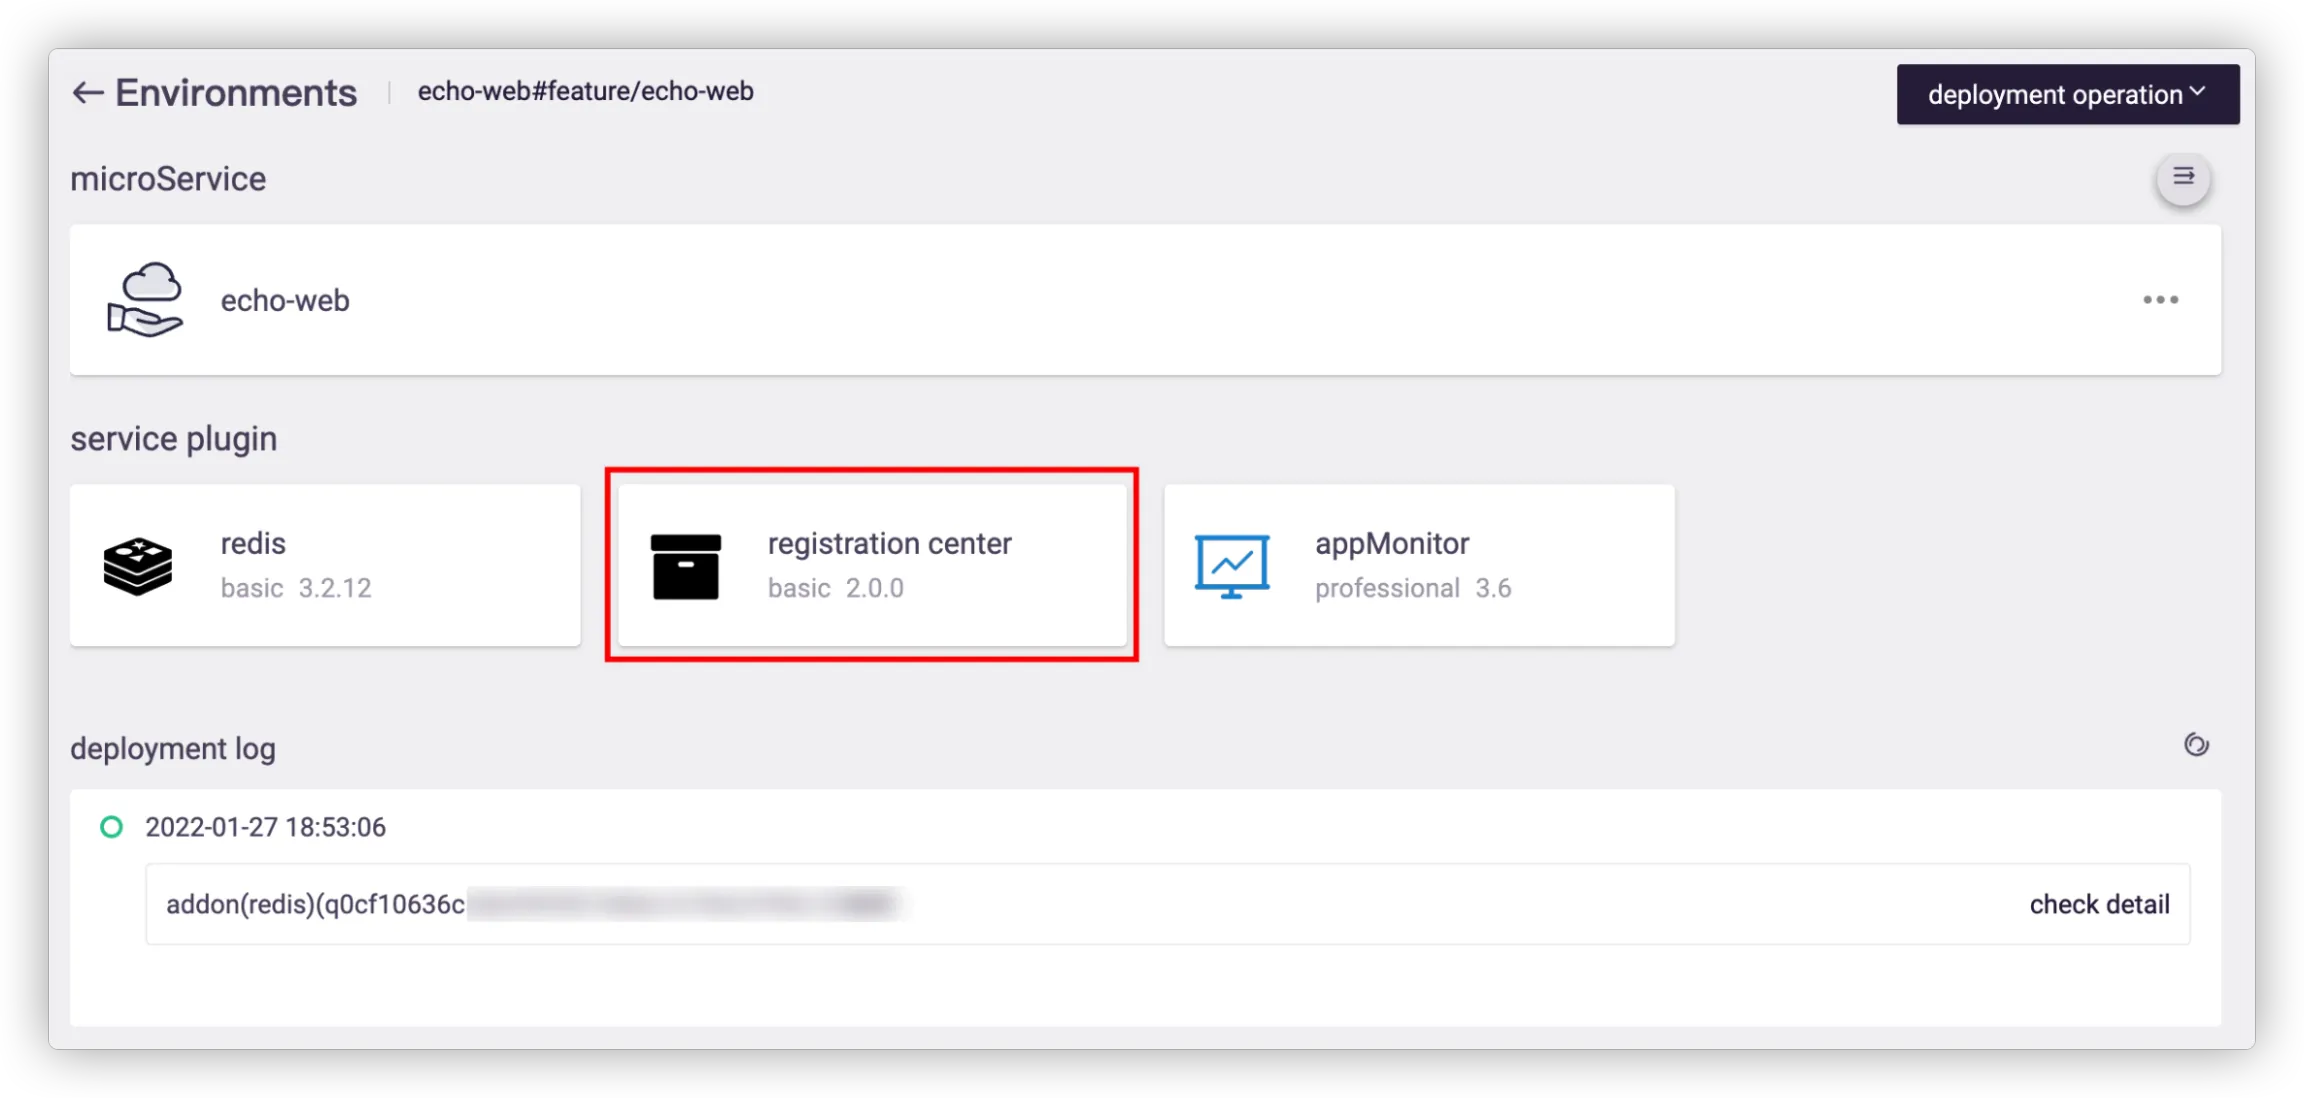
Click Registration Center, or go to Microservice Platform > Service Management > Register Center to view HTTP protocol.
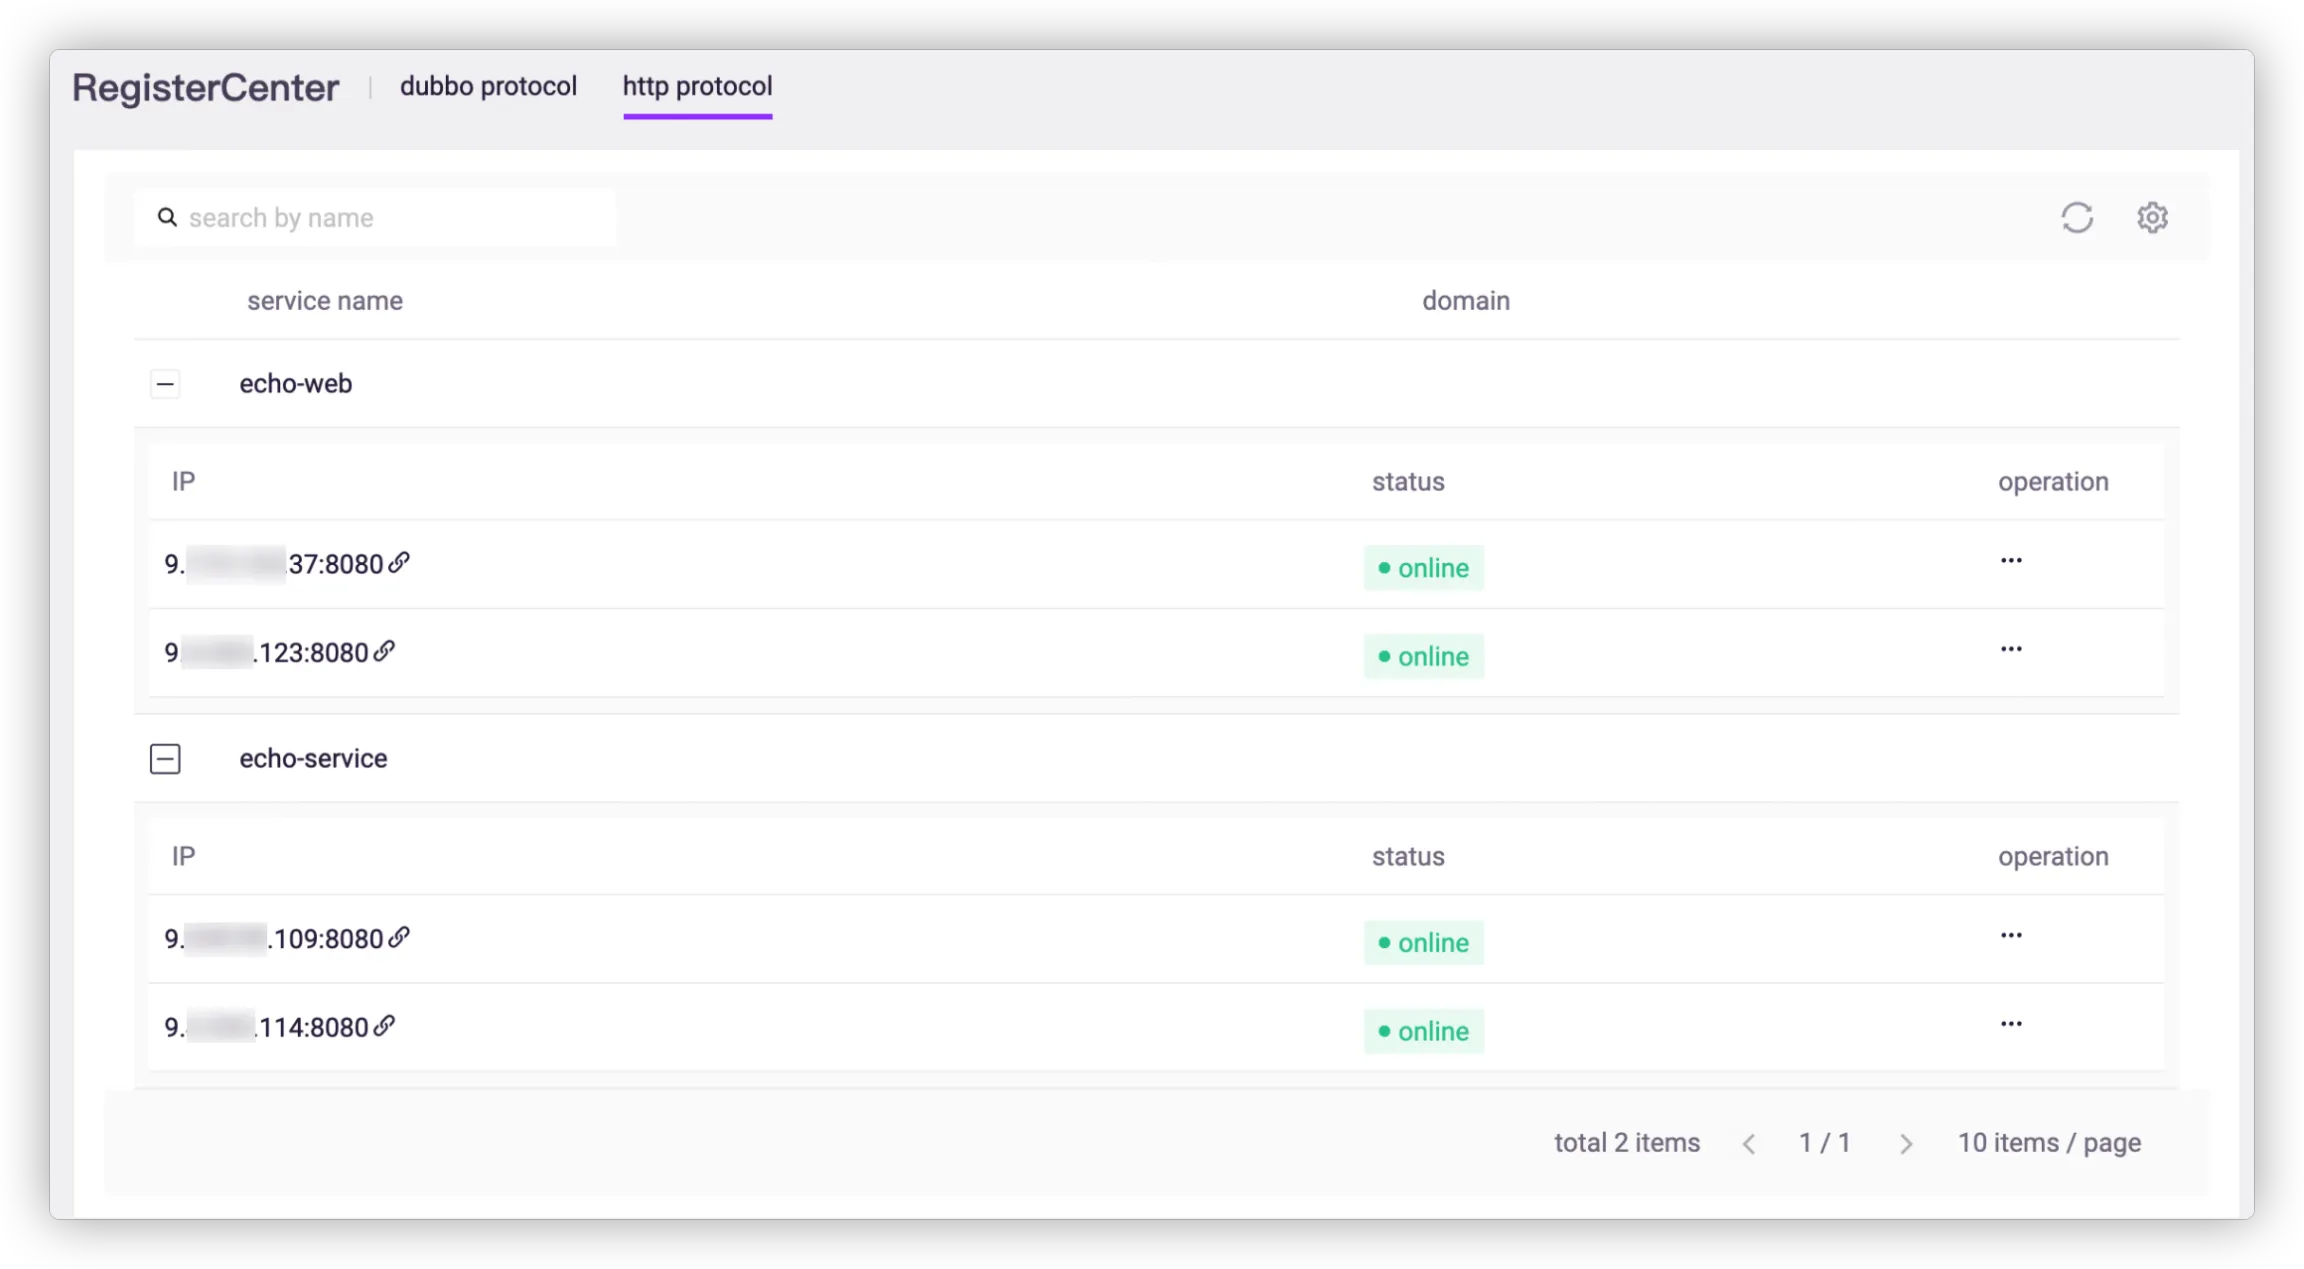
So far, service registration and discovery are completed for both echo-service and echo-web.
# API Access Testing
# Relate to Applications
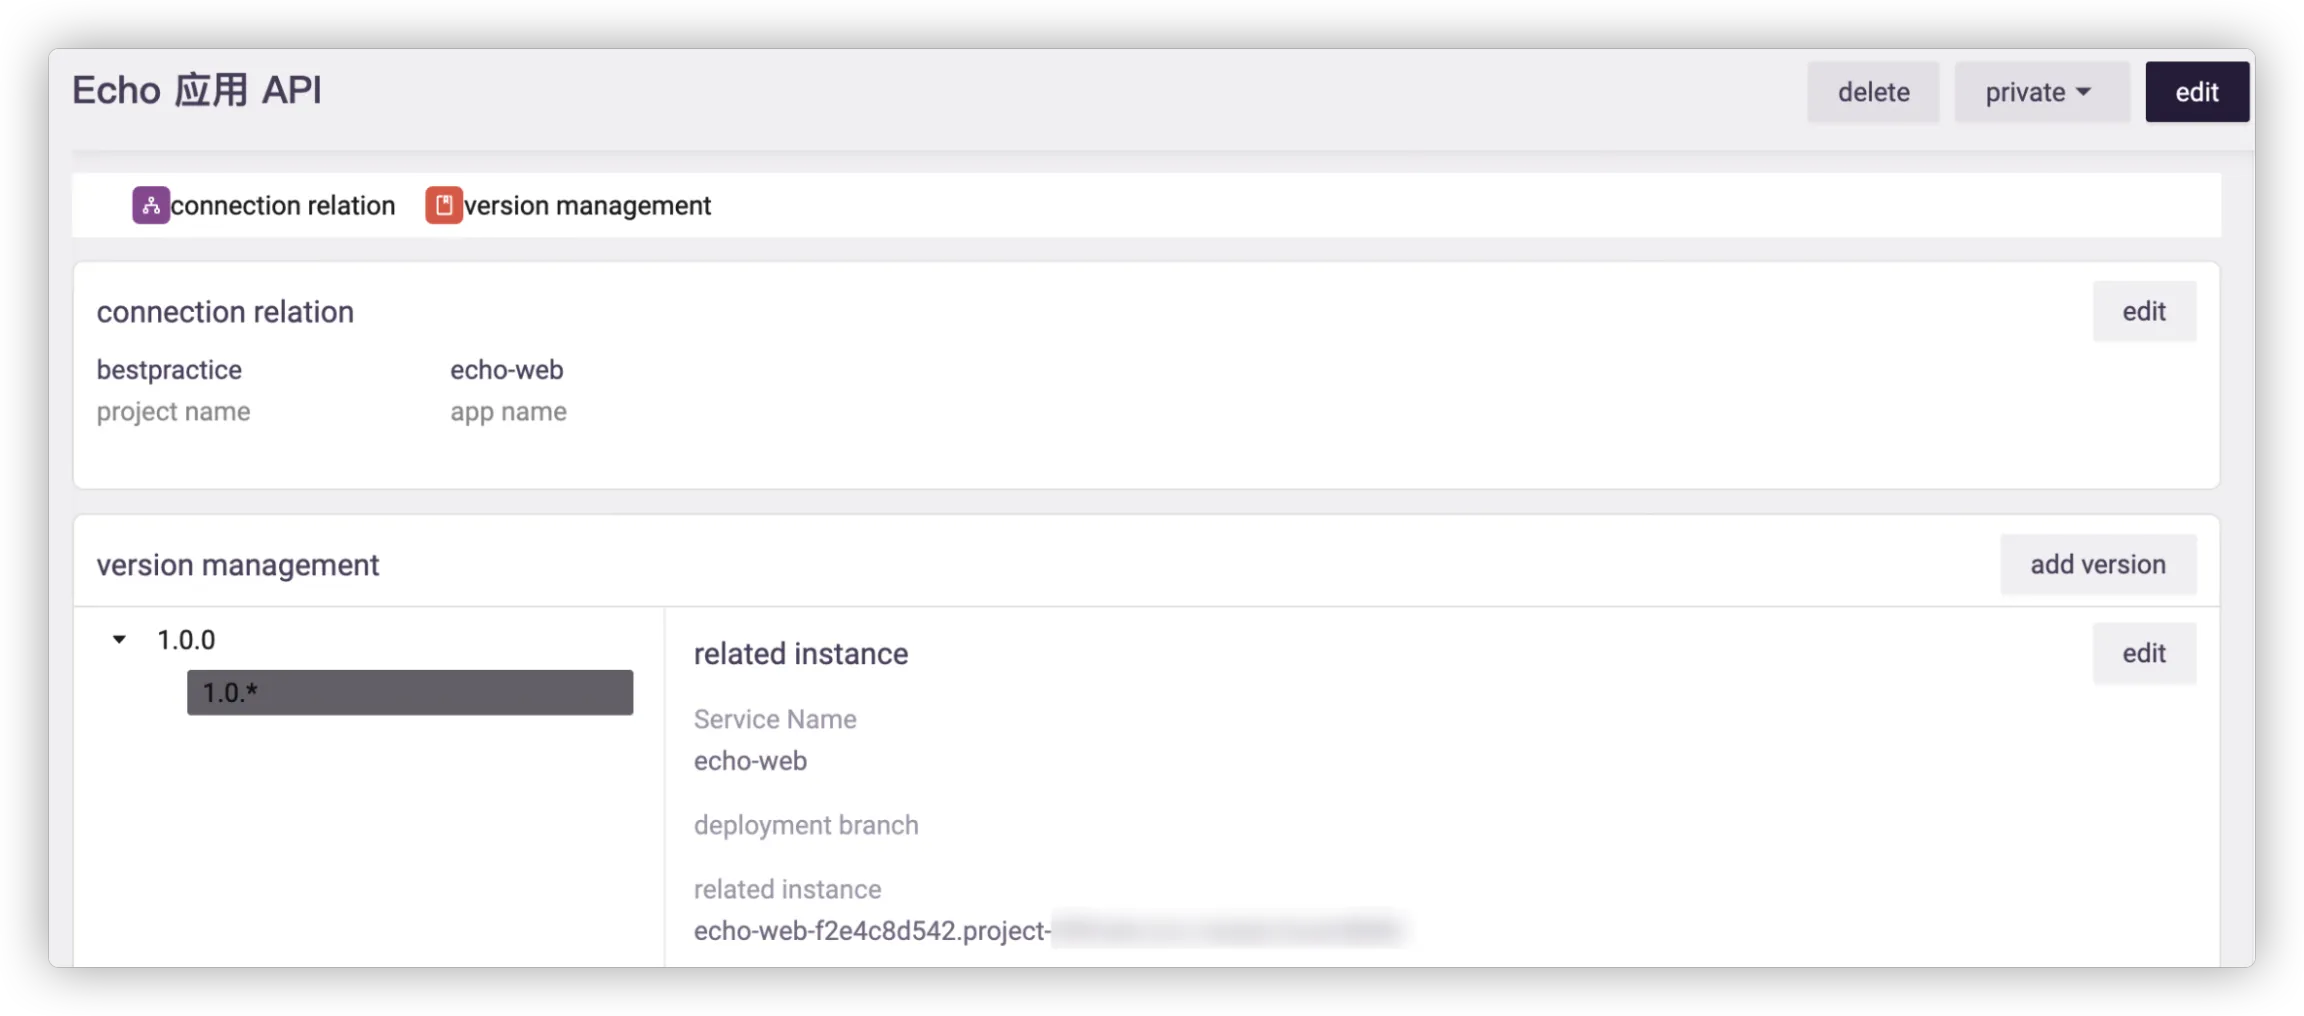
Go to DevOps Platform > API > API Market, and click Manage of echo API.
- Relation: Select the project name as bestpractice and the application name as echo-web.
- Version Management: Select the service name as echo-web, the deployment branch as feature/echo-web, and the related instance as echo-web-xxx.svc.cluster.local:8080.
Tips
- An application can contain multiple services.
- The related instance is a VIP domain name (Kubernetes service domain name). Since multiple pod instances can be deployed in a service, Erda realizes load distribution of multiple pods through Kubernetes service.
# Create Access Entry
Go to DevOps Platform > API > Access Management and create an access entry.
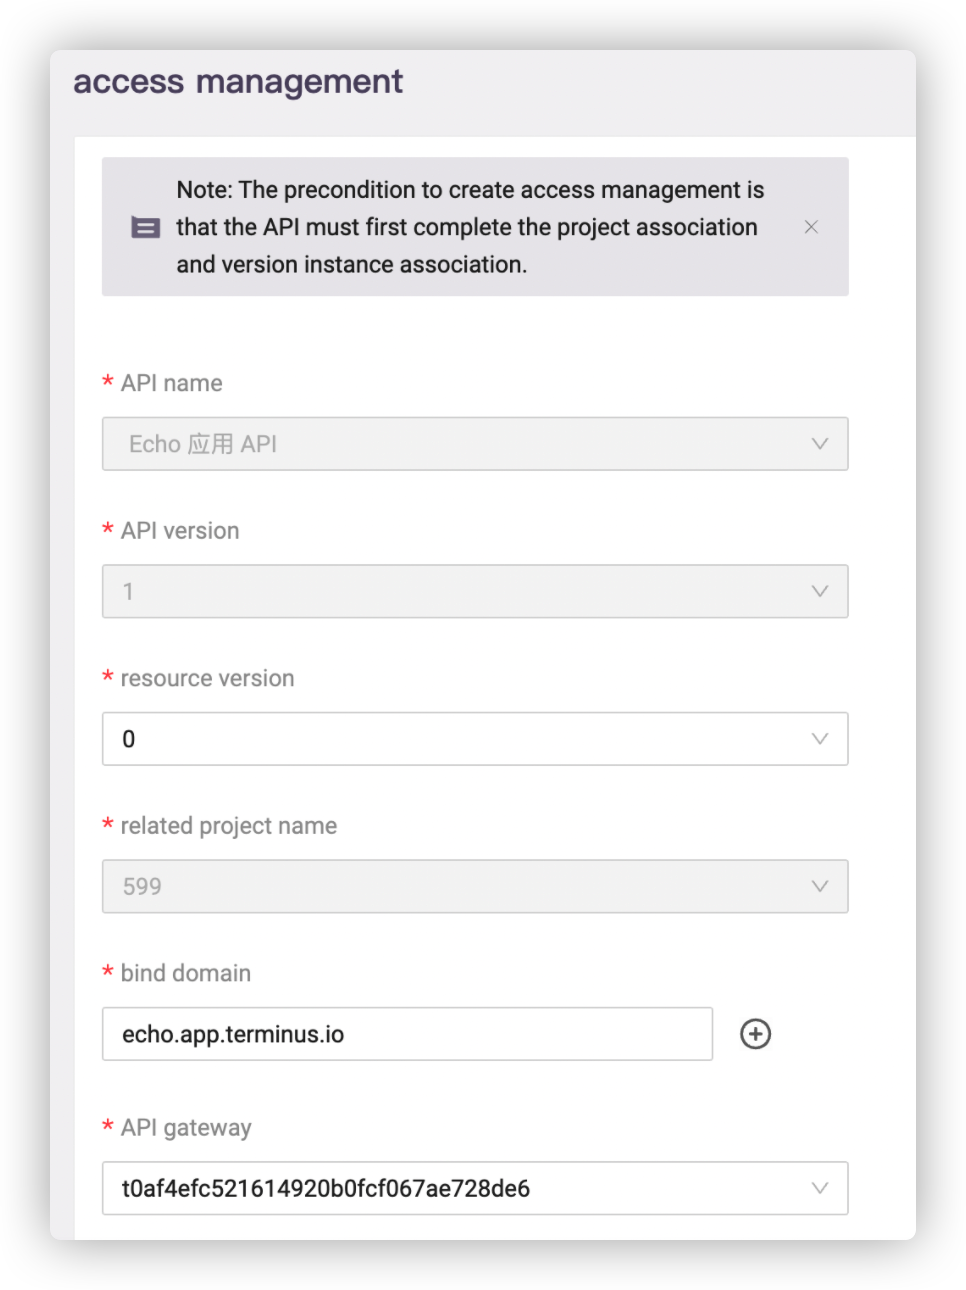
Tips
- Bind a public IP that has been resolved to Erda for Bind Domain to access service in public network.
- If you have not created an API gateway, please follow the prompts to create an API gateway first.
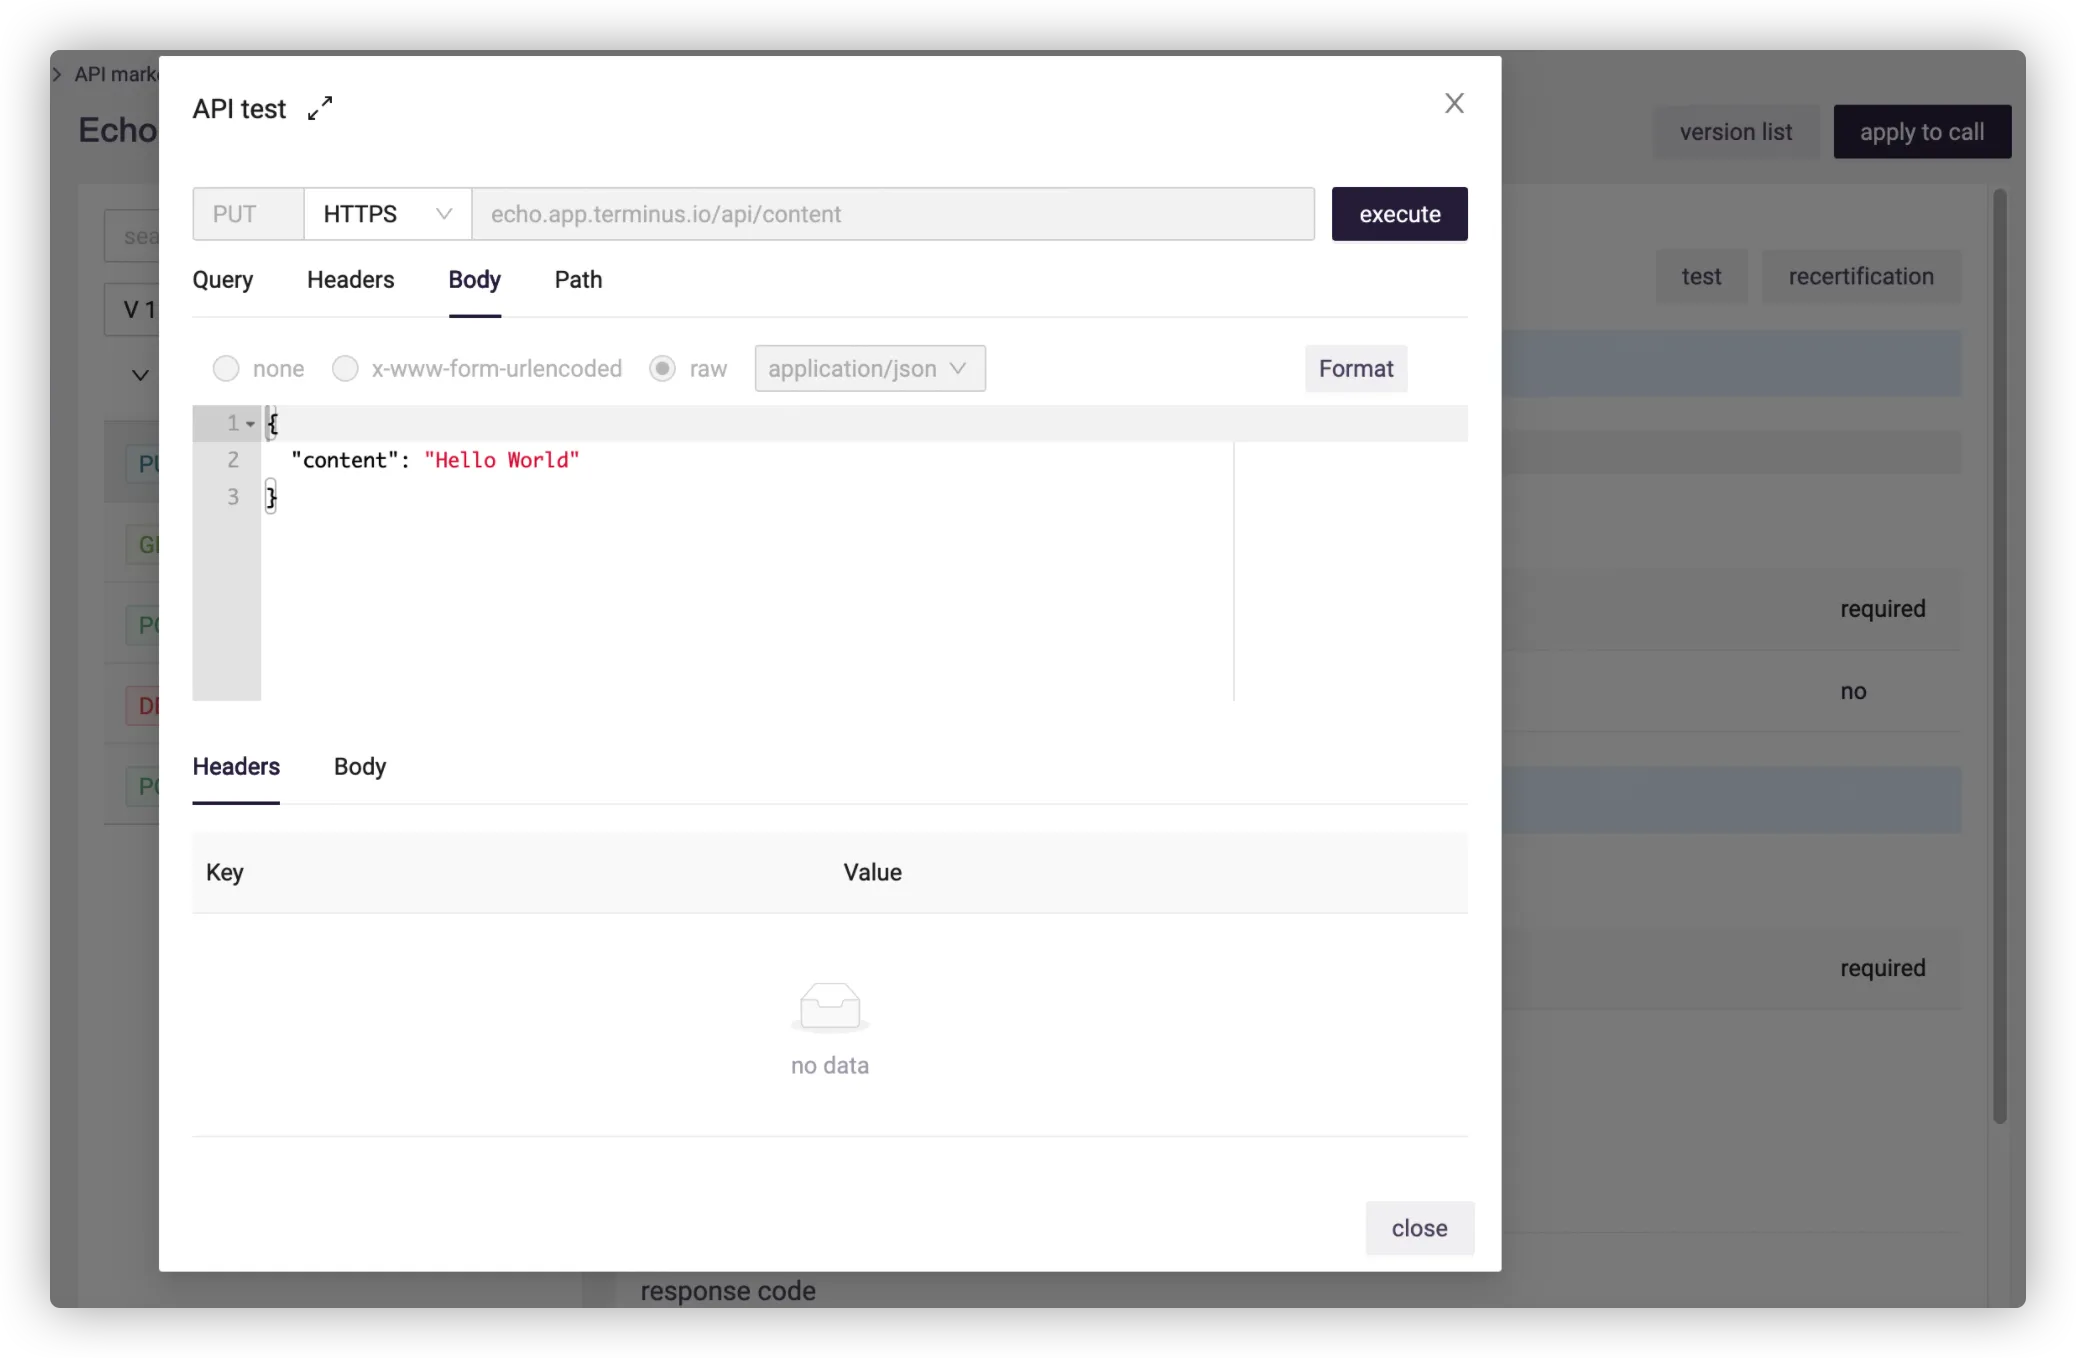
# Apply to Call and Test
Go to DevOps Platform > API > API Market > Echo API > Apply to Call. If no client is available, please create one first. Save the ClientID and ClientSecret for later testing.
After approval, go to API Market > Echo API > Authentication, enter the ClientID and ClientSecret, then select any API to start testing.
# Configuration Center Use
# Configuration Hot Loading of echo service
Add dependencies in pom.xml:
<dependency>
    <groupId>io.terminus.common</groupId>
    <artifactId>terminus-spring-boot-starter-configcenter</artifactId>
    <version>2.1.0.RELEASE</version>
</dependency>
Tips
Use Spring Boot Starter developed by Terminus to adapt to Erda.
Add slowTime variable to simulate time-consuming request in io.terminus.erda.bestpractice.echo.controller.ErrorController, and realize configuration hot loading via configuration center:
@RefreshScope
@RestController
@RequestMapping(value = "/echo/error")
public class ErrorController {
    @Value("${echo.slowtime:100}")
    private int slowTime;

    @RequestMapping(method = RequestMethod.POST)
    void errorGet(@RequestBody EchoError err) throws Exception {
        if (err.getType().equals("slow")) {
            Thread.sleep(slowTime);
        }
        else {
            throw new Exception("make exception");
        }
    }
}
The annotations @RefreshScope and @Value achieve configuration hot loading of echo.slowtime.
Add an addon of configuration center in dice.yml:
# Add API for echo web
Edit io.terminus.erda.bestpractice.echo.controller.ErrorController class to realize /api/error API:
@RefreshScope
@RestController
@RequestMapping(value = "/echo/error")
public class ErrorController {
    @Value("${echo.slowtime:300}")
    private int slowTime;

    @RequestMapping(method = RequestMethod.POST)
    void errorPost(@RequestBody EchoError err) throws Exception {
        if (err.getType().equals("slow")) {
            Thread.sleep(slowTime);
        }
        else {
            throw new Exception("make exception");
        }
    }
}

class EchoError {
    private String type;

    public void setType(String type) {
        this.type = type;
    }

    public String getType() {
        return type;
    }
}
# Verification
Run pipelines of echo-web and echo-service again for deployment update.
Click Configuration Center in Environments of echo-service, or go to Microservice Platform > Service Management > Config Center to set the value of echo.slowtime:
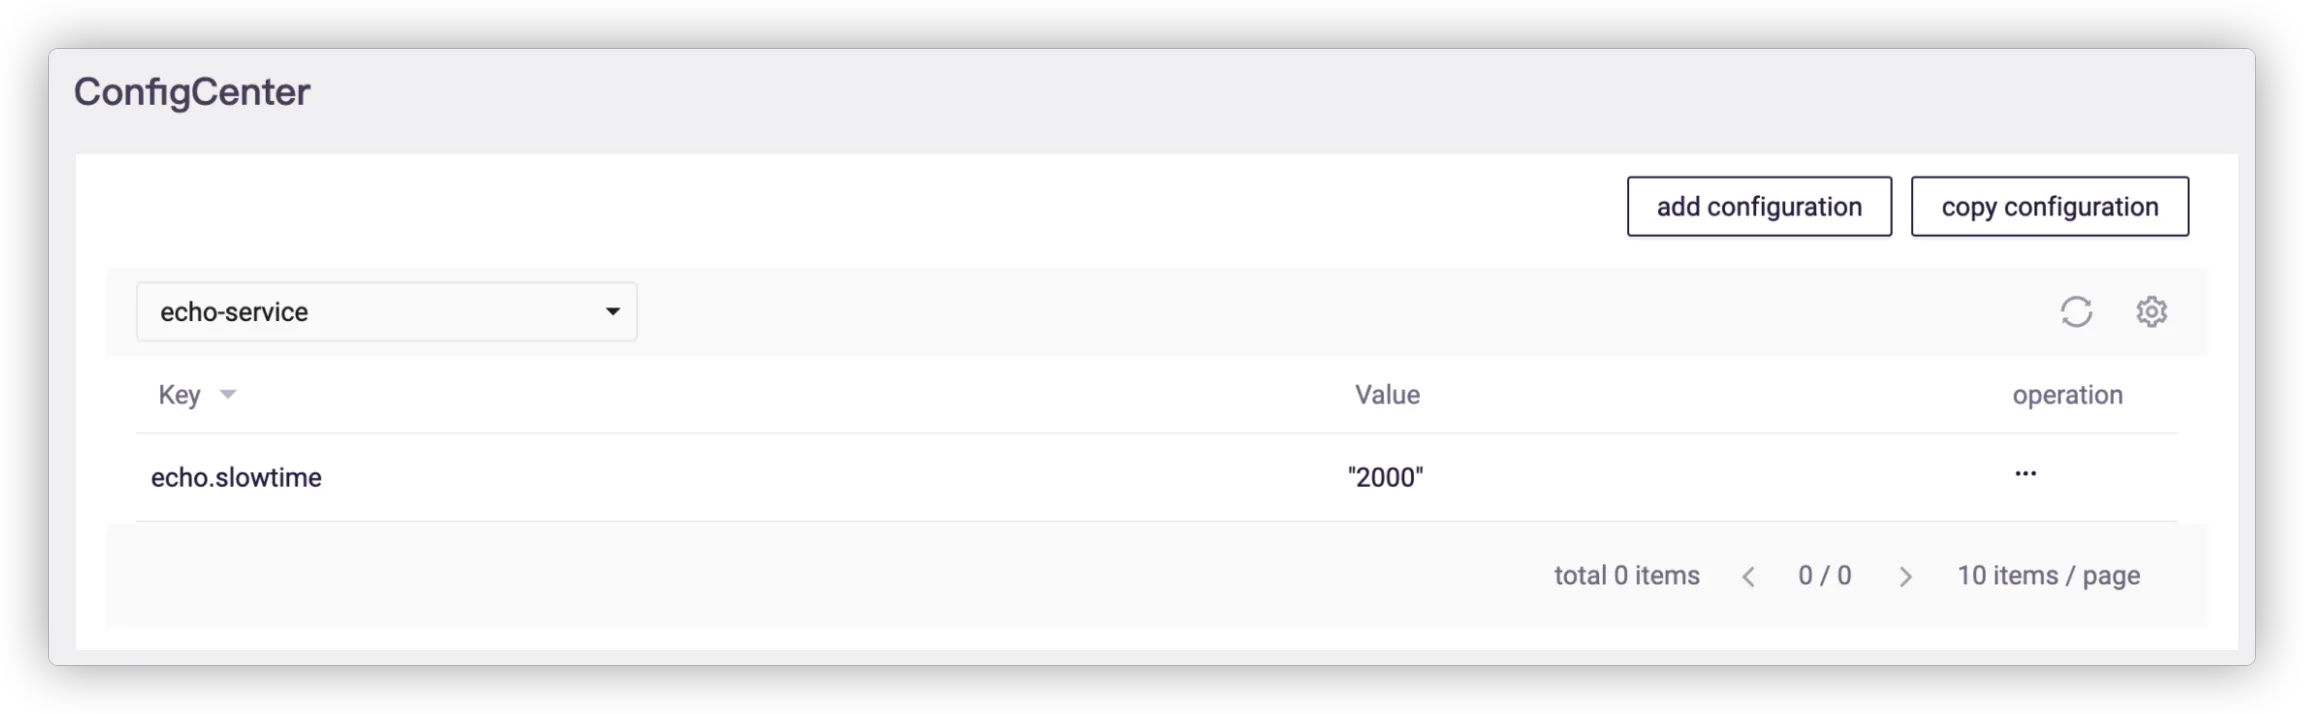
Set the value from small to large (such as 500, 1000, 1500), and each configuration will be hot-loaded to take effect in real time, then you can call /api/error API on the API test interface for access.
# Service Governance
# Prerequisites
Please make some requests and exceptions first for service governance.
- Call the /api/contnet interface to realize resource creation, deletion and modification.
- Set echo.slowtime as 1500 and call the /api/error interface while type=slow to simulate a timeout.
- Call the /api/error interface while type=exception to simulate an exception.
Tips
As Feign calls use Ribbon for load balancing by default, and the default timeout of Ribbon is 1 second, so the interface can simulate a timeout when the echo.slowtime is set over 1 second.
# Platform Governance
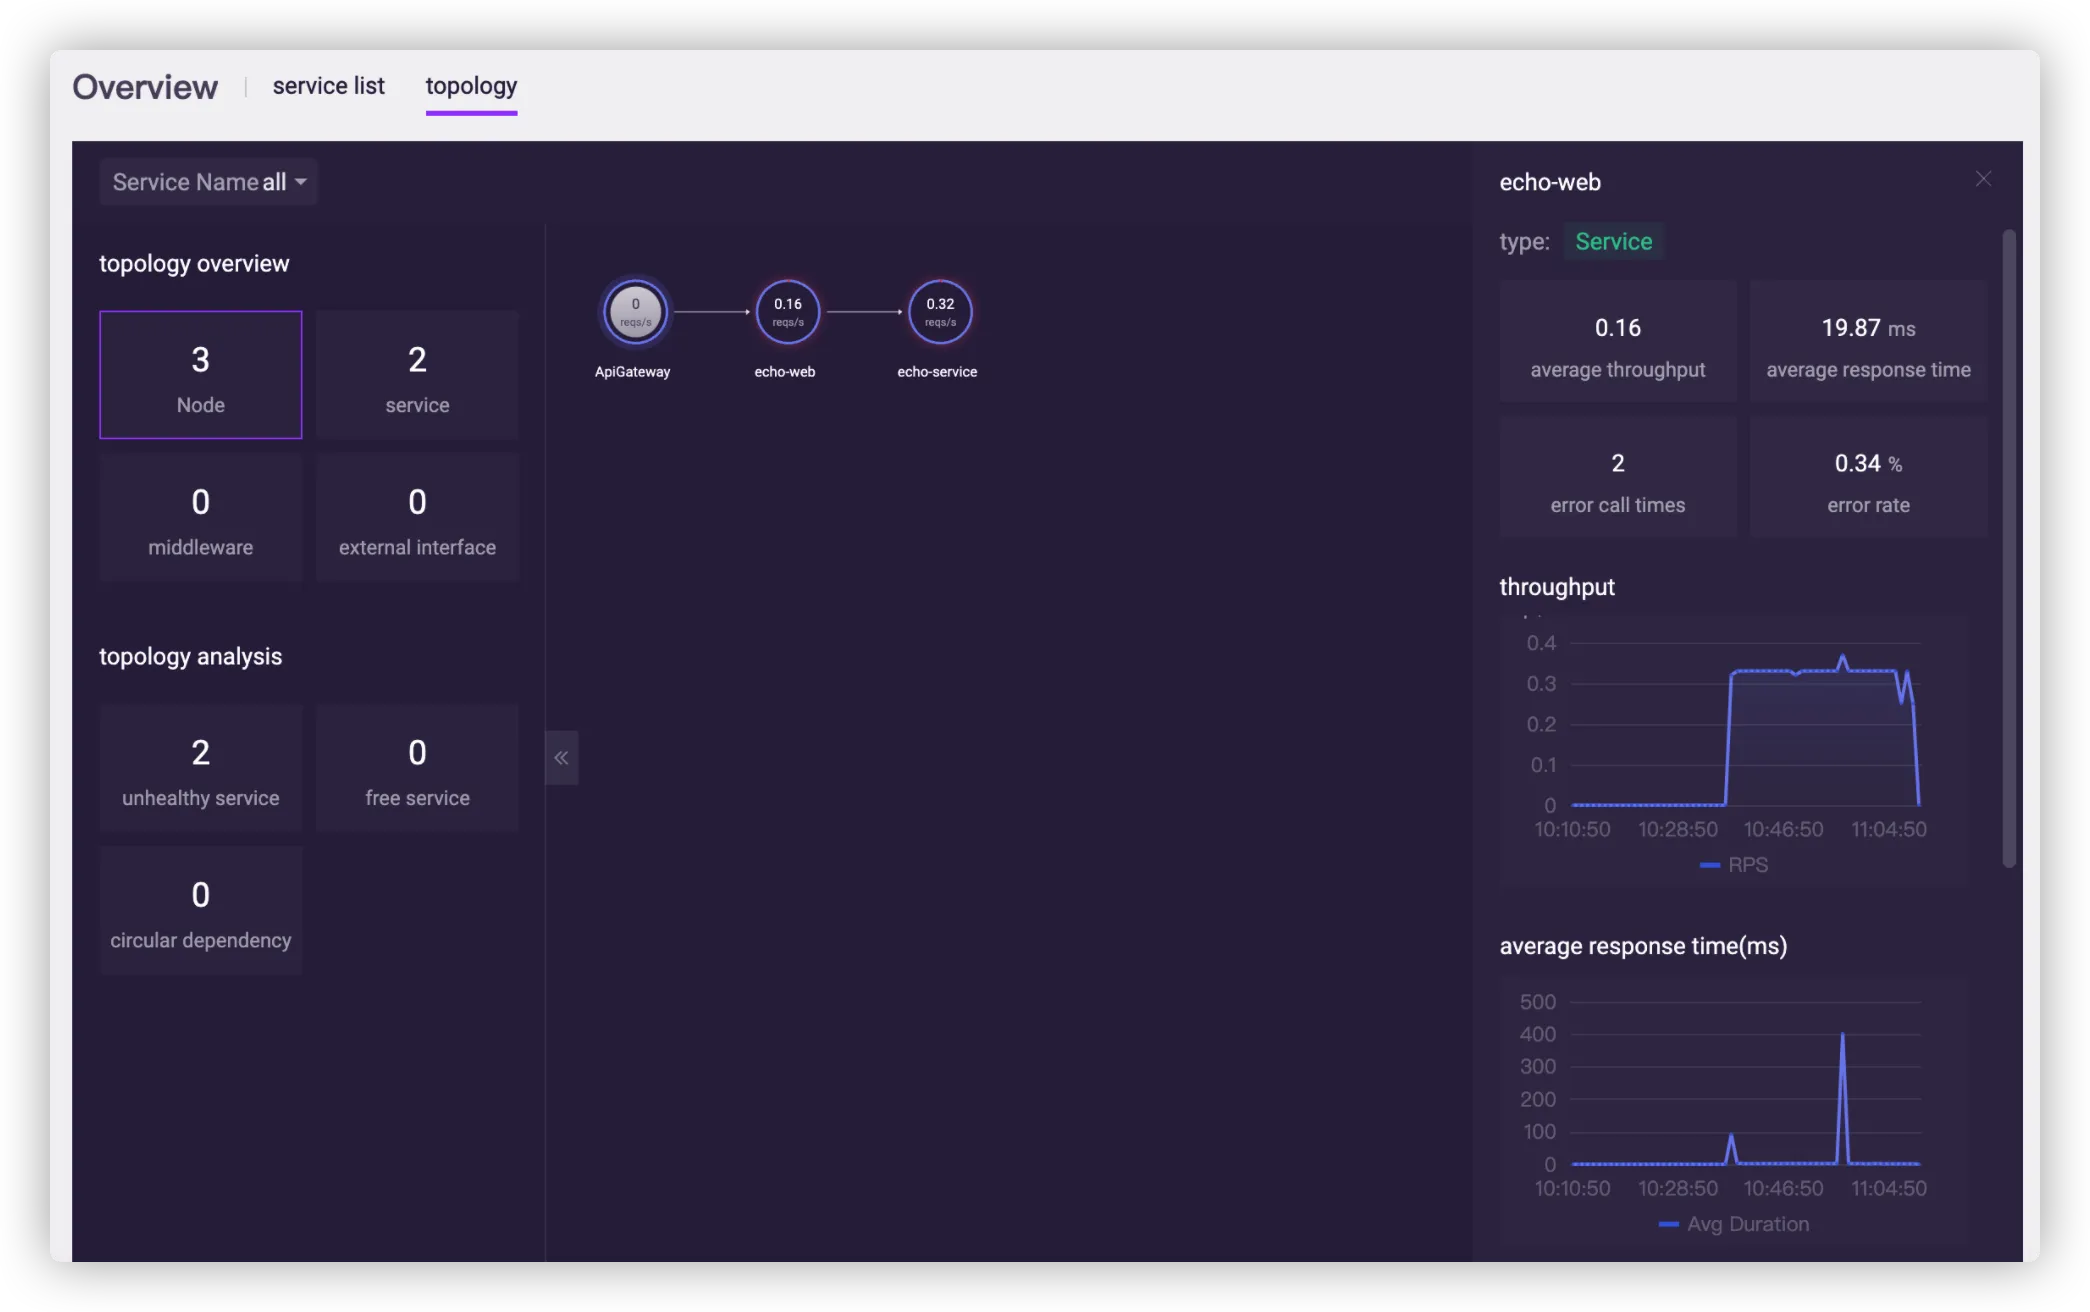
Go to Microservice platform > Overview > Topology, and view the microservice panorama of the project, with exceptions marked in red.
Go to Monitor Center > Service Monitor > Tracing Query, and select Tracking Status as Error to view the abnormal tracing information.
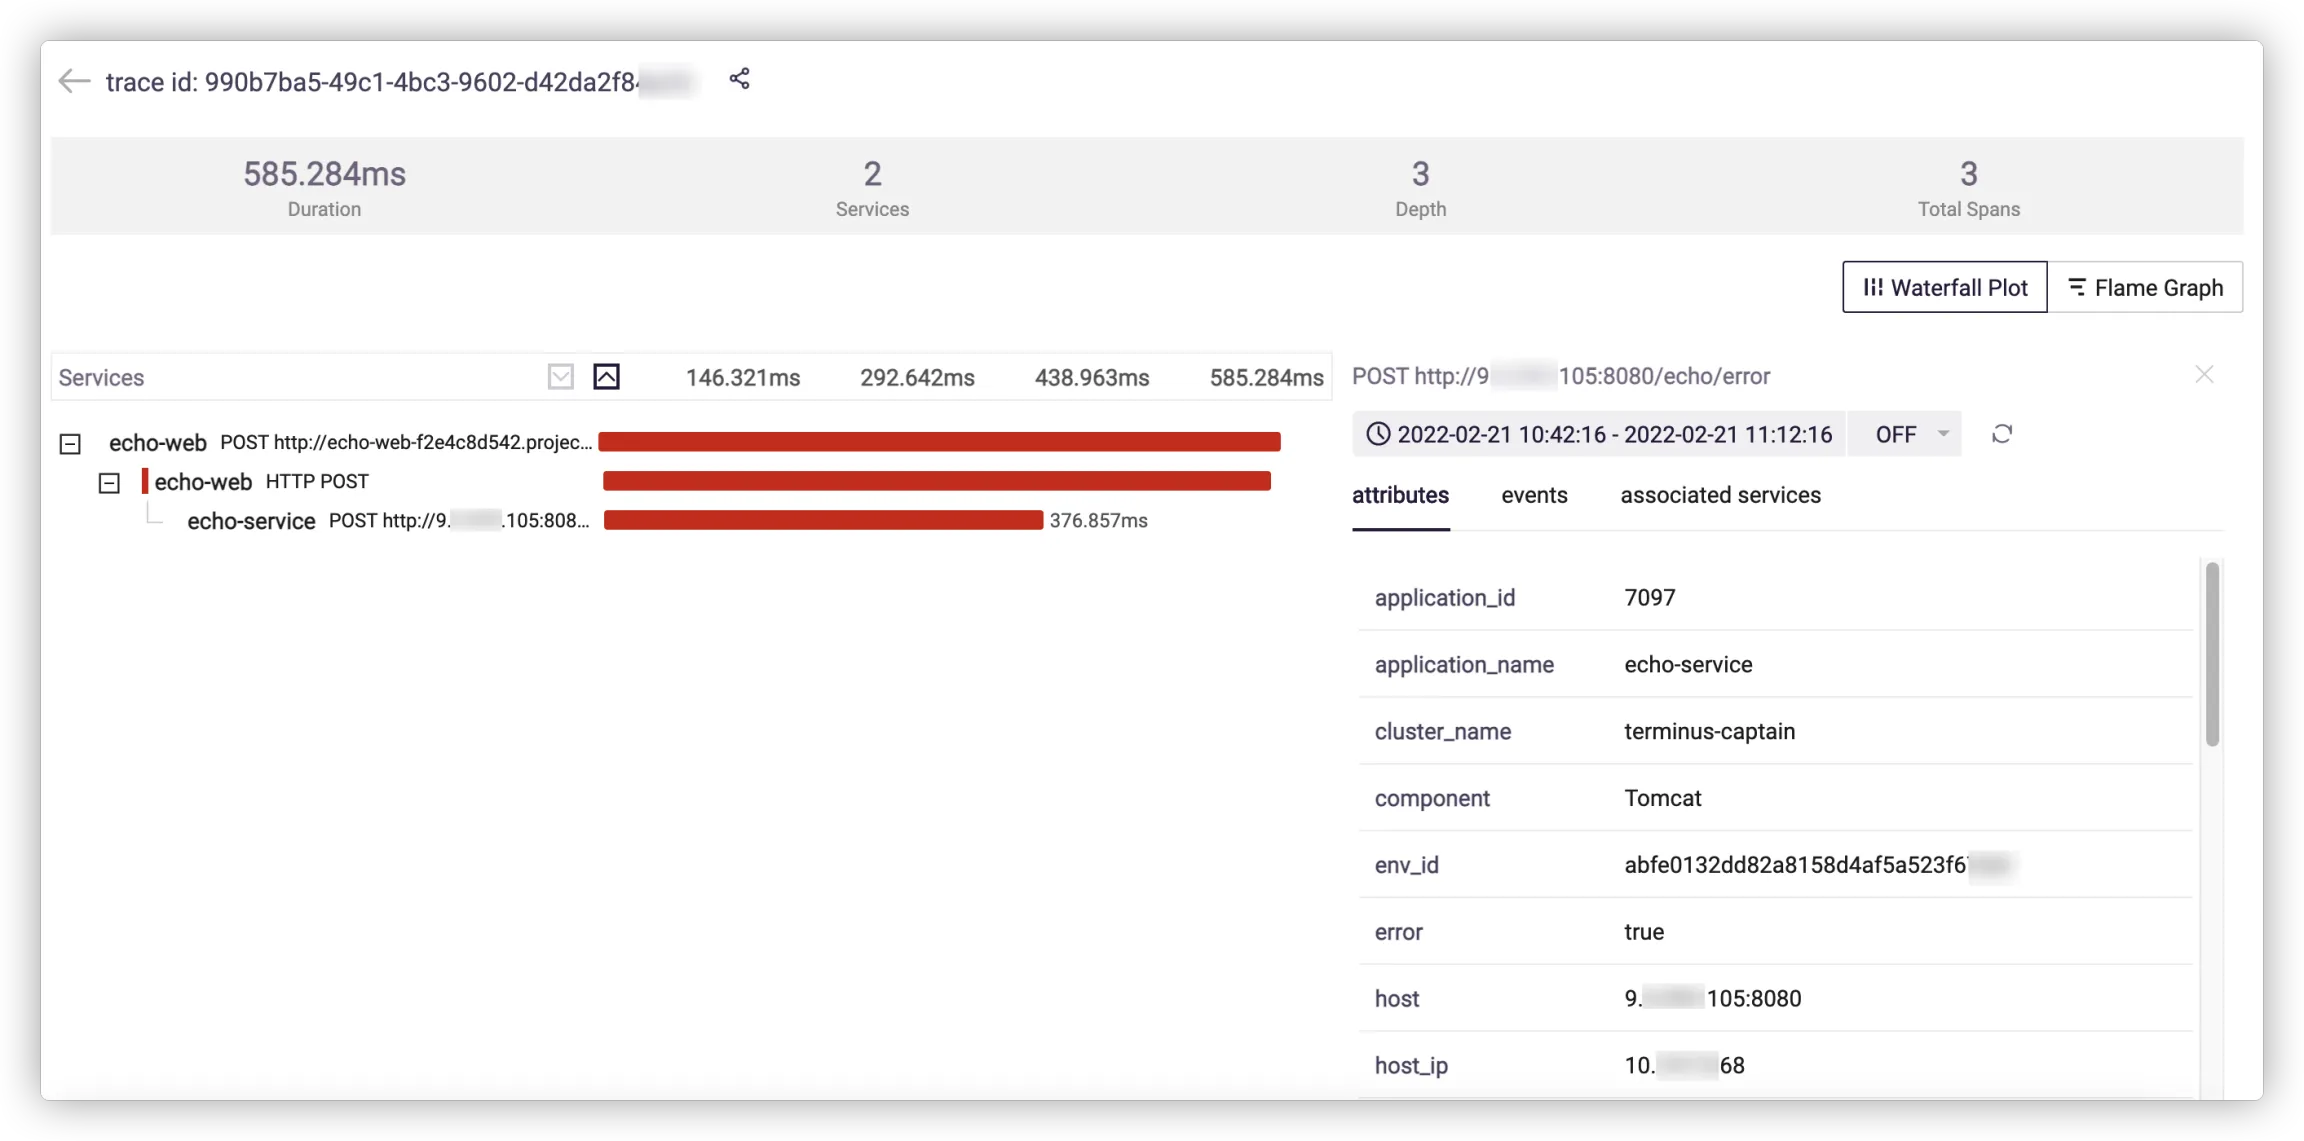
As can be seen from the above figure, the /echo/error interface of echo-service takes 500+ milliseconds and leads to slow requests.
For details, see Service Analysis.
So far, you have finished Spring Cloud development on Erda by an echo microservice project. The whole process involves microservice components (registration center and configuration center), CI/CD workflow, API design and testing, service exception observation, etc. For details, see guides of each platform.